 Free UK Delivery On Orders Over £30
 90 Day Returns
How To Replace Golf Shoe Spikes: Tools, Tips & Steps Fast
RYWorn-down spikes kill your grip before you even notice. One slippery stance on a wet tee box, and suddenly your swing, and your confidence, falls apart. Knowing how to replace golf shoe spikes is a basic skill every golfer should have, yet plenty of players put it off until the traction is completely gone. The good news? It's a quick job that takes minutes, not hours, and you don't need any special experience.
In this guide, we'll walk you through everything: identifying the right replacement spikes for your shoes, the only tool you actually need, and a clear step-by-step process for removing old cleats and fitting new ones, including what to do when they're stubbornly stuck in place.
At MoreSports, we stock golf footwear and accessories from brands like FootJoy, Stuburt, and adidas, so we know these products inside and out. Whether you bought your golf shoes from our Coleraine store or online, this guide will help you keep them performing at their best, with fresh spikes fitted in no time.
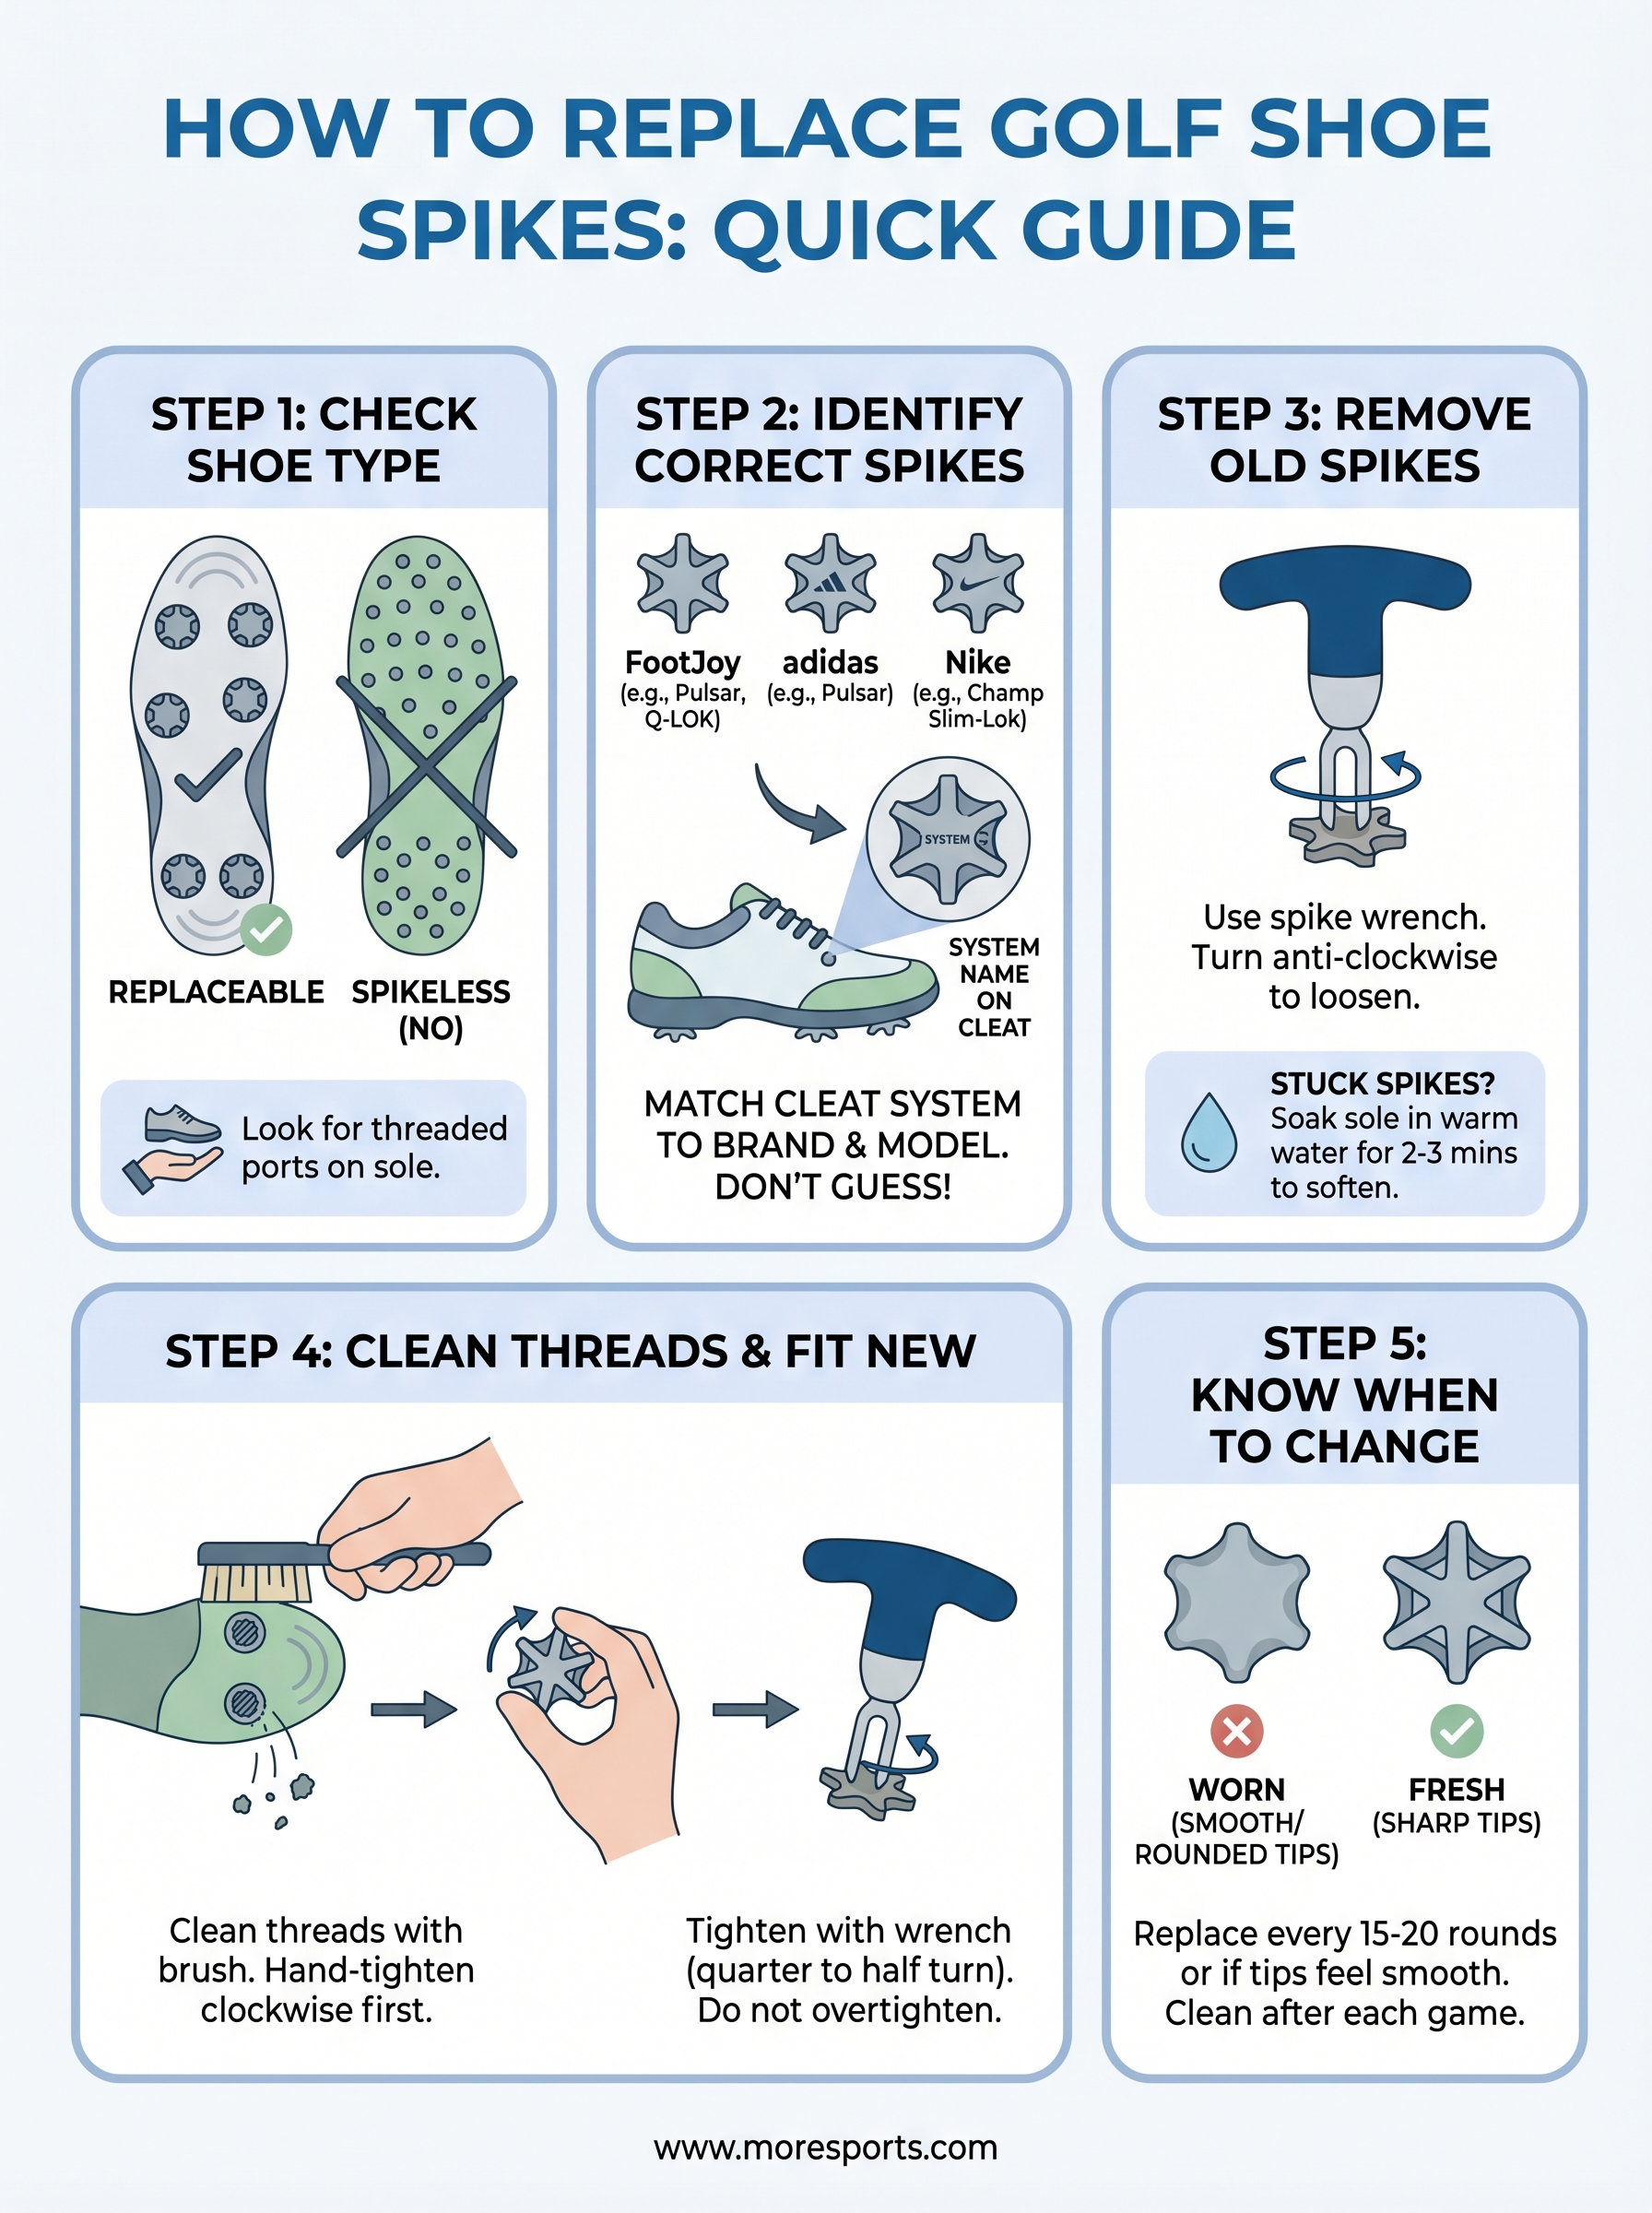
Before you start: check shoe type and get tools
Before you learn how to replace golf shoe spikes, you need to confirm what type of sole your shoes have. Not all golf shoes use replaceable spikes, and fitting the wrong cleat type can strip the inserts or leave you with loose cleats mid-round. A quick check before you buy anything saves both time and money.
Check your spike system
Golf shoes fall into three main categories, and identifying yours takes about ten seconds. Flip the shoe over and look at the sole: if you see small round ports with internal ridges, your shoe takes replaceable spikes. If the sole is smooth rubber with moulded grip patterns, it's spikeless and cannot be re-spiked.
| Shoe type | Sole appearance | Replaceable spikes? |
|---|---|---|
| Soft spike | Round threaded ports | Yes |
| Hard spike (older) | Metal or ceramic cleats visible | Yes |
| Spikeless | Moulded rubber nubs | No |
If you're unsure which cleat system your shoe uses, check the brand name printed on the existing spikes or look up your shoe model on the manufacturer's website to confirm compatibility.
Gather your tools
You only need one specialist item to do this job: a spike wrench, sometimes called a cleat tool or spike key. Most golf shoes include one in the box, but if you've misplaced it, replacements are inexpensive and easy to find. Have these items ready before you start:
- Spike wrench matched to your cleat system
- Correct replacement spikes for your shoe brand
- Warm water and a stiff brush for cleaning the threads
- A soft cloth or towel to rest the shoe on
Step 1. Identify the right replacement spikes
Buying the wrong spikes is the most common mistake people make when learning how to replace golf shoe spikes. Cleat systems are not universal, and most brands use a proprietary fitting, so checking your exact spike type before you purchase is essential.
Match the cleat system to your shoe brand
Different brands use different systems, and the spike system name is usually printed on the existing cleat or in your shoe's product documentation. The table below covers the most common systems you will encounter:
| Brand | Spike system |
|---|---|
| FootJoy | Softspikes Pulsar, Q-LOK |
| adidas | Softspikes Pulsar |
| Stuburt | Tri-Lok, Pulsar |
| Callaway | Softspikes Pulsar |
| Nike | Champ Slim-Lok |
If the text on your existing spikes has worn away, search your shoe model number on the manufacturer's website to confirm the correct cleat system.
Replacement spikes are sold by system name, so once you know which one you need, picking up the right pack is straightforward. Check the packaging carefully, as some brands offer multiple cleat types within the same system, including soft and firm ground variants.
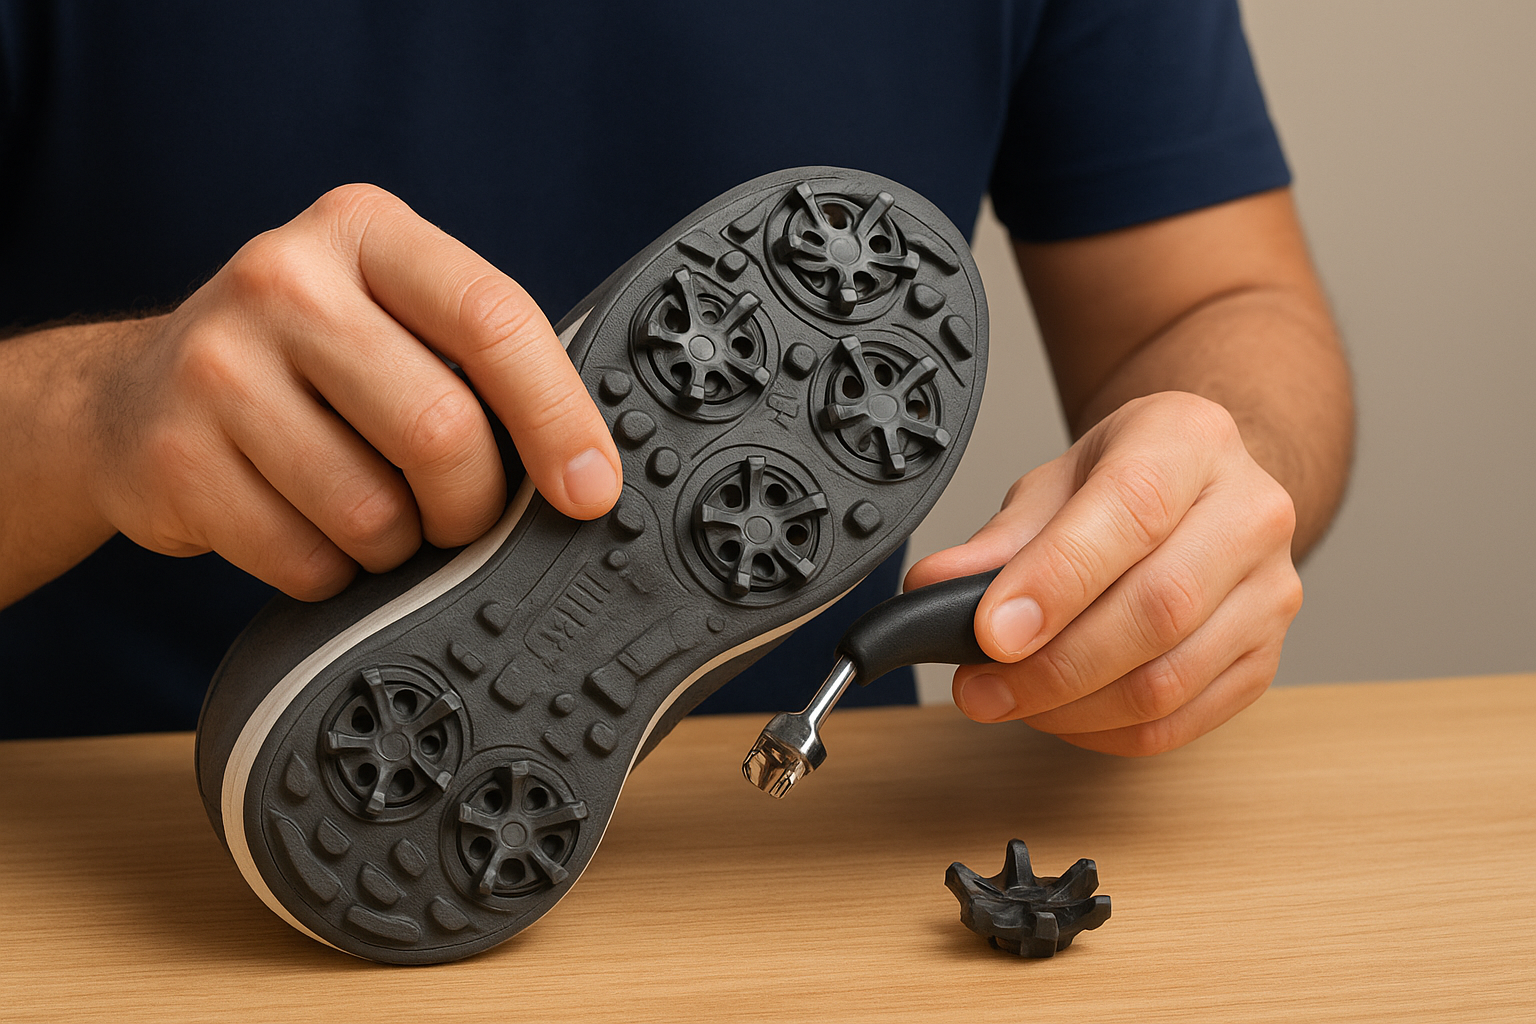
Step 2. Remove old spikes without damaging the inserts
Place the shoe sole-side up on a flat surface and fit the spike wrench firmly into the cleat's notches before applying any force. Turn the wrench anti-clockwise to loosen each spike, working around the shoe in a consistent pattern rather than jumping between cleats at random.
How to loosen stuck spikes safely
Older spikes often bond to the insert threads from prolonged exposure to wet ground and dirt. If a spike won't budge, soak the sole briefly in warm water for two to three minutes to soften any compacted debris around the cleat. Apply steady, controlled pressure with the wrench rather than forcing it sharply, which risks snapping the insert.
If the insert itself starts to spin rather than the spike, stop immediately and use a small flathead screwdriver to hold the insert steady from inside the shoe.
Once you know how to replace golf shoe spikes properly, avoiding insert damage is the step that most people rush. Take your time with each cleat removal and your inserts will remain in good condition for years.
Step 3. Clean the threads and fix common problems
Once all the old spikes are out, clean each insert thread before fitting anything new. Use a stiff brush dipped in warm water to scrub out compacted dirt and debris from the threaded ports. Dry the sole thoroughly with a cloth before moving on, as moisture left in the threads can cause new spikes to corrode faster.
Fixing the most common spike problems
The most frequent issue people encounter when learning how to replace golf shoe spikes is a stripped insert thread. If the insert spins freely or feels loose, the threading is damaged and the insert needs replacing. A local cobbler or golf shop can press in a new insert affordably rather than you replacing the whole shoe.
If grit keeps blocking your inserts between rounds, apply a small amount of petroleum jelly to the threads after fitting to slow debris build-up.
A second common problem is mismatched spike systems, where the new cleat partially fits but will not tighten fully. Double-check the system name against your shoe documentation before forcing the wrench.
Step 4. Fit new spikes and tighten them correctly
Thread each new spike into its insert by hand first, turning clockwise until you feel light resistance. Starting by hand confirms the threads are aligned correctly before you apply any tool pressure, which prevents cross-threading and insert damage from the start.
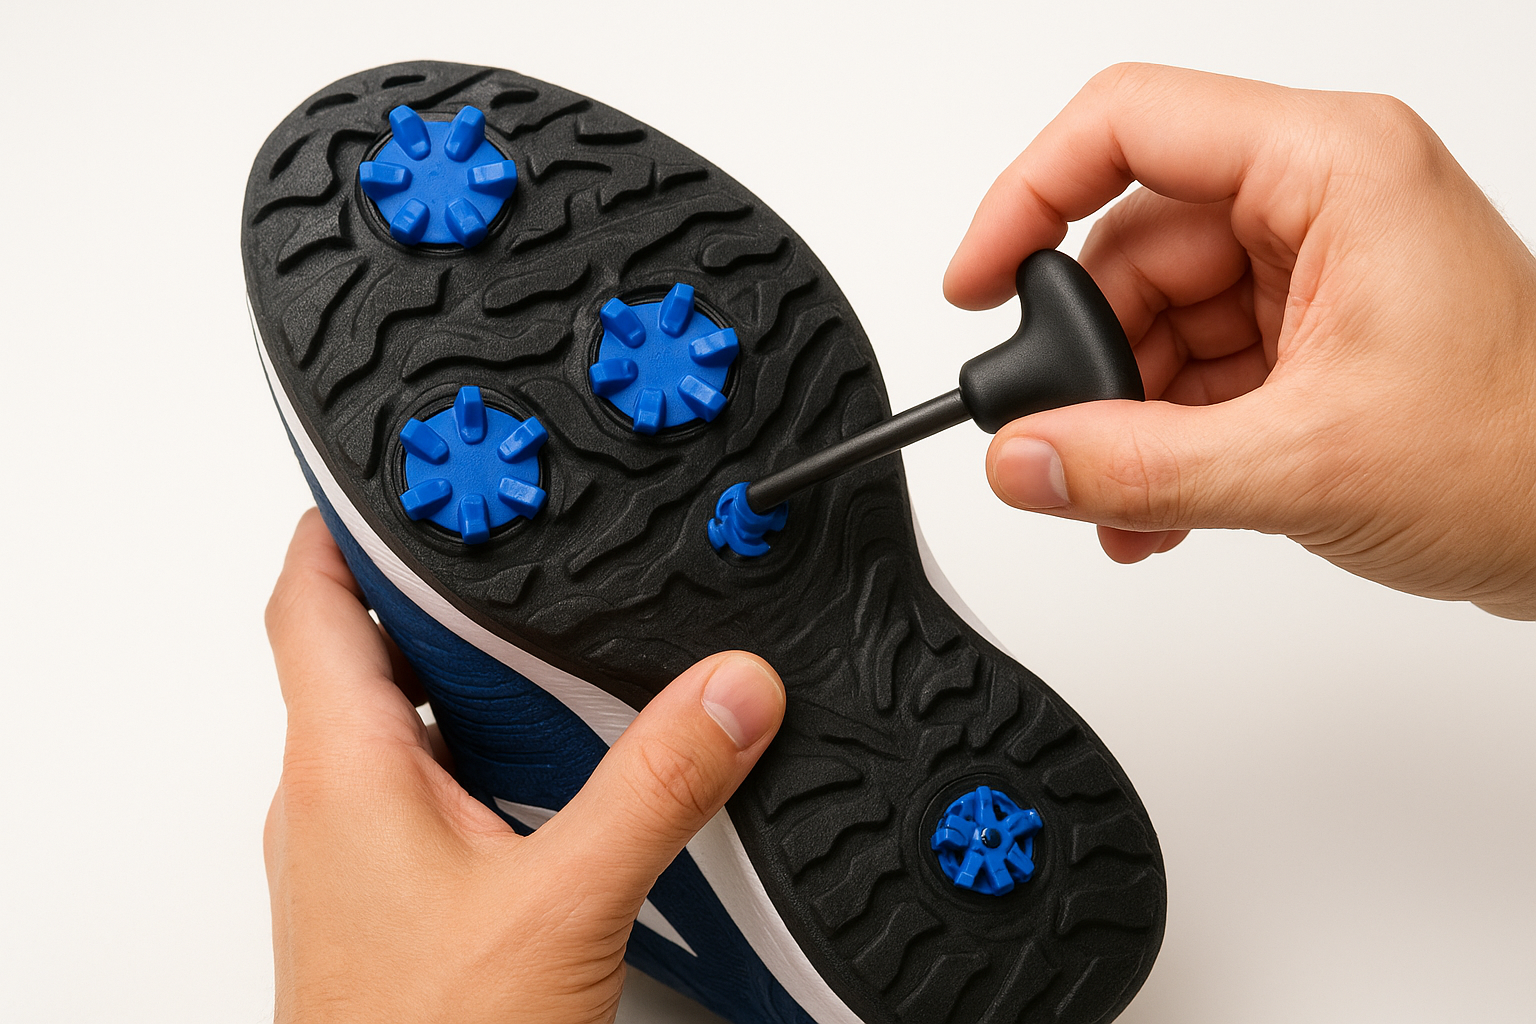
Tighten to the right torque
Once hand-tight, fit the spike wrench and turn each cleat a further quarter to half turn. You want the spike sitting flush against the sole with no movement when pressed. Avoid overtightening, as this strips the insert threads and makes future removal much harder.
Work your way around the shoe in a diagonal pattern rather than going cleat-by-cleat in a circle, which distributes pressure more evenly across the sole.
Knowing how to replace golf shoe spikes correctly means recognising when each cleat is properly seated. Give each spike a firm thumb press after tightening. If it shifts or rotates at all, it needs another quarter turn before you head out to the course.
Step 5. Know when to change spikes and keep them fresh
Knowing how to replace golf shoe spikes is only useful if you also know when to act. Replace spikes every 15 to 20 rounds for regular players, or at least once per season if you play occasionally.
Signs your spikes need replacing
Your spikes are worn when the traction tips feel smooth or rounded rather than sharp under your fingers. Other clear signals include slipping on wet turf and visible cracks in the cleat body. A quick check before each round takes seconds and catches problems before they cost you a shot.
Run your thumb across the spike tips after every few rounds. Flat tips mean it's time to replace them before your next game.
Keep spikes in good condition between rounds
Clean your cleats after each game to extend spike life significantly. A short end-of-round routine takes under a minute and keeps inserts in good shape:
- Brush mud and grass off each cleat
- Rinse with cold water if heavily soiled
- Air dry the shoe fully before storing
Ready for your next round
You now have everything you need to know about how to replace golf shoe spikes quickly and without damaging your shoes. Fresh cleats restore the grip that keeps your feet stable through every swing, and the whole process takes less than fifteen minutes once you have the right tool and the correct replacement spikes in hand.
Staying on top of spike maintenance is one of the simplest ways to protect your game. Check the cleat tips every few rounds, clean the sole after each game, and swap in new spikes before the traction drops off. Small habits like these extend the life of your shoes and keep you performing at your best on any turf.
When you're ready to pick up replacement spikes, golf footwear, or accessories, browse the full range at MoreSports, where you'll find competitive prices on top brands with free UK delivery over £25.