 Express Tracked UK Delivery On 1000s of Items
 90 Day Returns
How to Clean Golf Shoes: Leather, Mesh, Spikes & Care Tips
R YYour golf shoes take a beating on the course. Mud, grass stains, morning dew, and sand traps leave their mark after every round. You might worry that cleaning them the wrong way could damage the leather, mess up the waterproofing, or even harm those expensive spikes. That hesitation is fair when you have invested in quality footwear.
Cleaning your golf shoes at home is simpler than you think. With basic supplies you already have and the right technique, you can remove dirt and grime while protecting the materials. Whether your shoes are leather, synthetic, or mesh, each material needs its own approach to stay in top condition.
This guide walks you through every step of cleaning your golf shoes properly. You will learn how to prep and clean different materials, tackle stubborn dirt on soles and spikes, and dry your shoes without causing damage. We also cover protection treatments and storage tips to keep your shoes match ready for seasons to come.
Why cleaning your golf shoes matters
Dirty golf shoes degrade faster than clean ones. Mud and grass clippings contain acids and enzymes that break down leather, synthetic materials, and adhesives over time. When you leave dirt to dry and harden, it works into seams and stitching, causing premature wear and waterproofing failures.
Your performance suffers with caked-on dirt too. Spiked outsoles lose their grip when debris fills the gaps between cleats, making your stance less stable during swings. Dried mud adds unwanted weight to your shoes, and trapped moisture inside creates odours that are tough to eliminate later.
Regular cleaning extends the life of your golf shoes by up to two seasons compared to neglected pairs.
Knowing how to clean golf shoes properly saves you money in the long run. Quality golf shoes represent a significant investment, and proper care ensures they deliver consistent comfort and support round after round.
Step 1. Get set up and prep your shoes
Proper preparation makes cleaning faster and more effective. Gather your supplies before you start so you won't need to interrupt the process halfway through. Having everything within reach lets you work methodically through each cleaning stage without searching for items mid-task.
What you need
Collect these basic supplies that you probably already have at home. Most items cost nothing if you repurpose household cleaning products and old brushes.
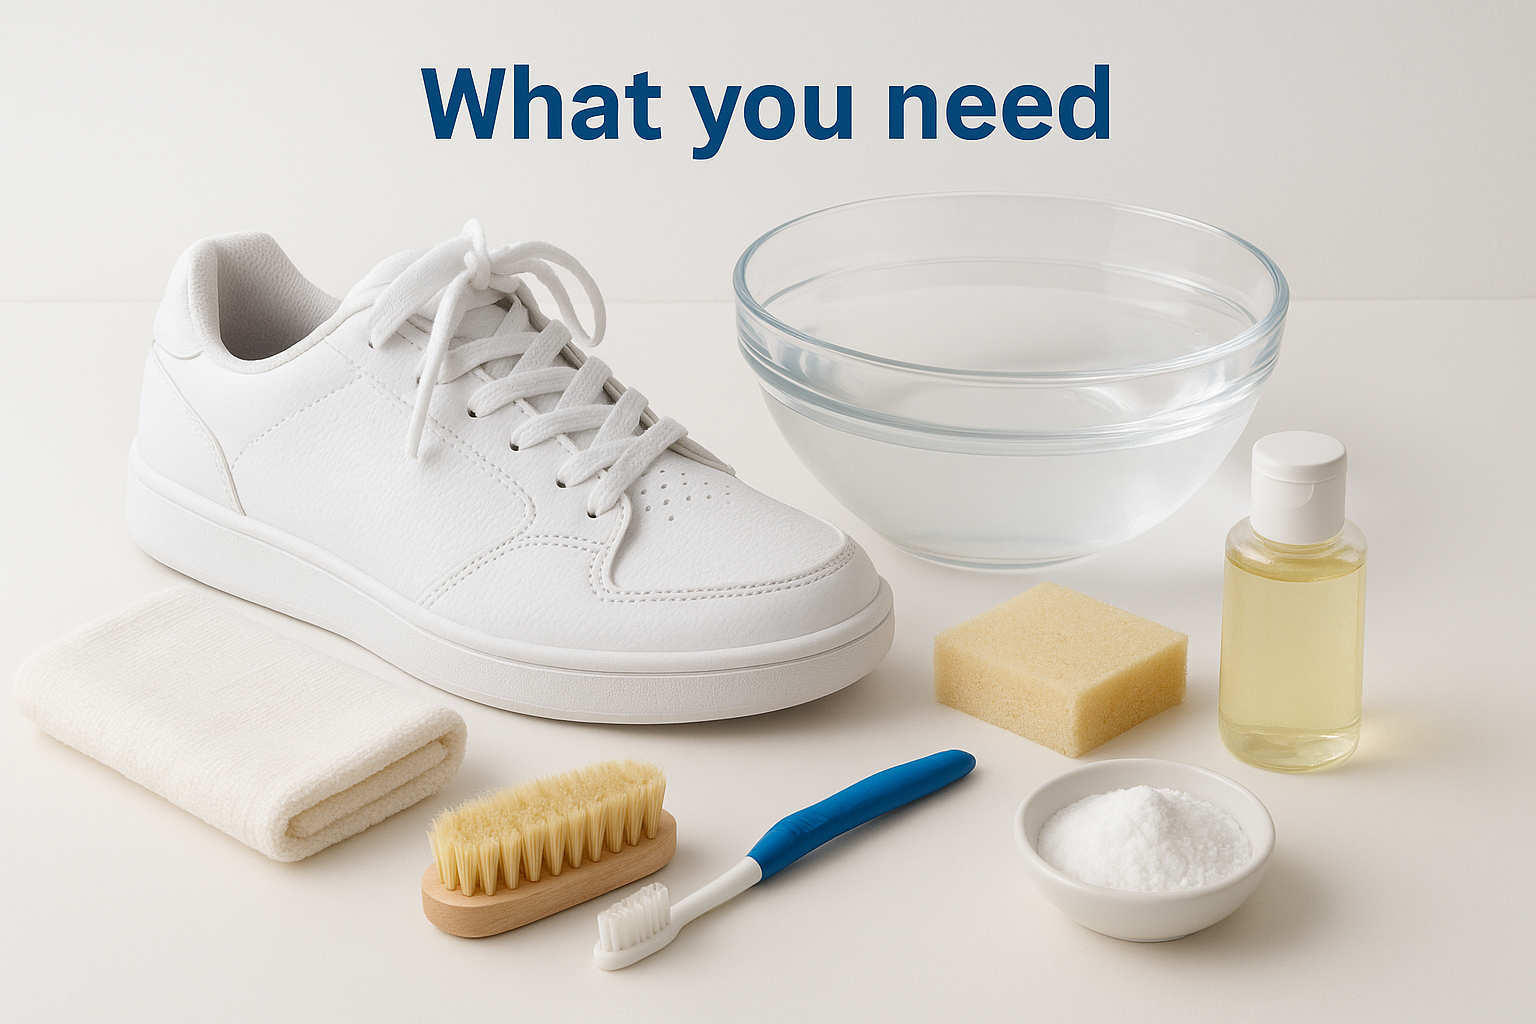
- Warm water in a basin or bowl
- Soft brush (old toothbrush ideal)
- Mild dish soap or specialist shoe cleaner
- Clean cloth or sponge
- Towel for drying
- Optional: baking soda for odours
Remove laces and loose debris
Take out your laces completely to access all areas of the shoe. This lets you clean the tongue properly and prevents laces from getting unnecessarily wet during the process. Knock your shoes together sole to sole to dislodge loose dirt and grass.
Use a dry brush to remove surface mud before introducing water. Dried dirt brushes off more easily than wet mud, which can smear and stain. Work the brush into crevices around the sole and along seams where dirt accumulates.
Starting with dry brushing prevents you from pushing mud deeper into the shoe material.
Check your spikes or cleats for stuck debris like stones. This prep work ensures you tackle how to clean golf shoes efficiently.
Step 2. Clean leather, synthetic and mesh uppers
Your shoe's upper material determines your cleaning approach. Leather needs gentle treatment to preserve its natural oils, while synthetic and mesh materials tolerate more vigorous scrubbing. Using the wrong method can damage waterproofing or cause discolouration, so match your technique to your shoe type.
Make your cleaning solution
Mix a small amount of mild dish soap into warm water in your basin. The water should feel comfortably warm to touch but not hot, as excessive heat can damage adhesives and materials. Aim for light suds rather than thick foam because too much soap leaves residue that attracts more dirt later.
You can substitute specialist shoe cleaner for dish soap if you prefer. These products often contain conditioners that benefit leather, though plain soap works perfectly well for most cleaning jobs.
Clean leather uppers
Dip your soft cloth or sponge into the solution and wring out excess water until it feels damp rather than soaking. Leather absorbs moisture easily, and saturating it can cause stiffening or cracking as it dries. Work in small circular motions across the leather surface, paying extra attention to creases and stitching where dirt accumulates.
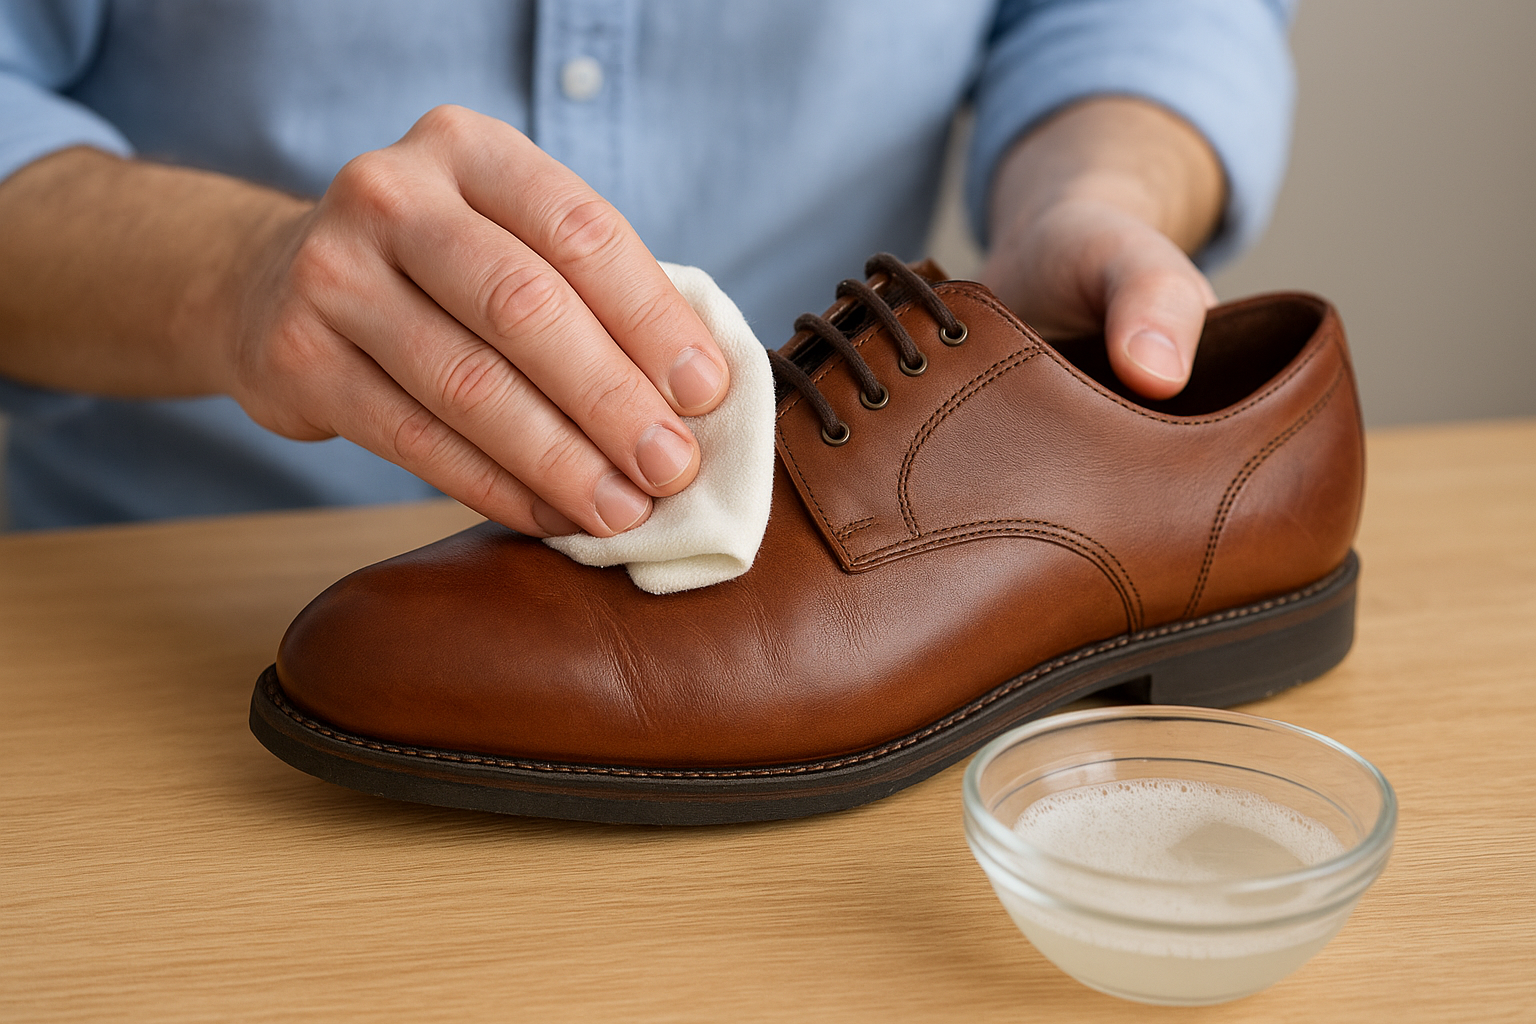
Avoid harsh scrubbing on smooth leather as this can scratch the finish. For stubborn marks, let the damp cloth sit on the area for 30 seconds to soften the dirt before gentle wiping. After cleaning, wipe the leather with a clean damp cloth to remove soap residue.
Never use bleach or harsh chemical cleaners on leather golf shoes as these strip protective oils and cause irreversible damage.
Clean synthetic and mesh materials
Synthetic materials handle more aggressive cleaning than leather does. You can use your soft brush with the soapy solution to scrub synthetic uppers, which removes ground-in dirt more effectively. Work the brush in circular motions, then wipe clean with your damp cloth.
Mesh sections need the toothbrush for deep cleaning because dirt embeds in the weave. Brush gently to avoid snagging threads, but you can apply more pressure than you would on leather. This technique for how to clean golf shoes with mesh panels prevents permanent staining.
Step 3. Tackle soles, spikes and cleats
The outsoles carry the heaviest dirt load from your round, and cleaning them requires more aggressive techniques than you used on the uppers. This part of how to clean golf shoes removes the debris that affects your traction and stability on the course. You can use a firmer brush here because outsoles tolerate scrubbing that would damage leather or mesh.
Clean the outsoles
Dip your stiff brush into the soapy water and scrub the entire sole with firm circular motions. Pay special attention to the grooves and channels between tread patterns where mud and grass pack tightly. This embedded dirt reduces grip during your swing and adds unnecessary weight.
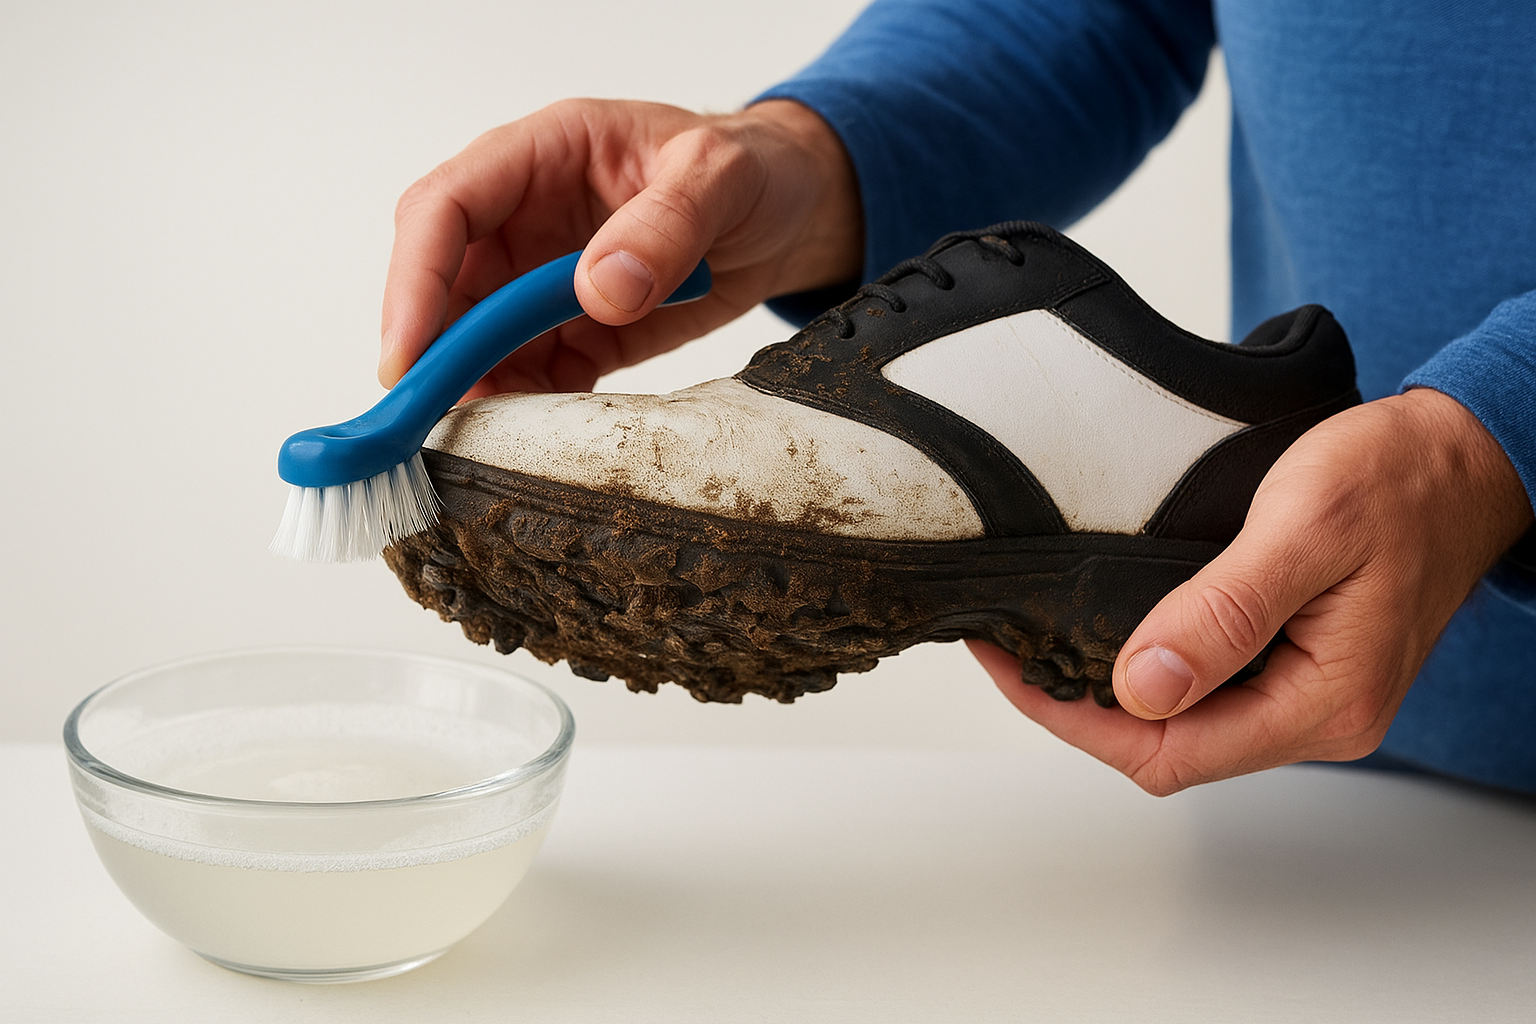
Hold the shoe at different angles to access all areas of the sole properly. For stubborn caked-on mud, let soapy water sit on the area for two minutes to soften it before scrubbing again. Use an old toothbrush to dig into narrow grooves that your larger brush cannot reach effectively.
Clean outsoles restore your shoes' grip and prevent dirt transfer onto car carpets and clubhouse floors.
Remove and clean spikes
Unscrew removable spikes using the correct wrench before cleaning them separately. Soak metal spikes in warm soapy water for five minutes, then scrub away rust and debris with your toothbrush. This maintenance extends spike life and maintains optimal traction.
Check the spike holes in your shoe sole for trapped dirt while spikes are removed. Use a cotton bud dipped in soapy water to clean these threaded holes thoroughly. Replace spikes once they are completely dry to prevent cross-threading.
Step 4. Dry, protect and store your shoes
Proper drying prevents material damage that wet shoes suffer when rushed or exposed to direct heat. The final steps of how to clean golf shoes determine whether your work preserves or harms the materials you just cleaned. Taking time to dry, protect and store correctly adds years to your shoes' lifespan and maintains their performance characteristics.
Air dry at room temperature
Place your shoes in a well-ventilated area away from direct sunlight or heat sources like radiators and heaters. These heat sources cause leather to crack, adhesives to weaken, and synthetic materials to warp. Stuff crumpled newspaper or kitchen paper inside each shoe to absorb internal moisture and help them maintain their shape as they dry.
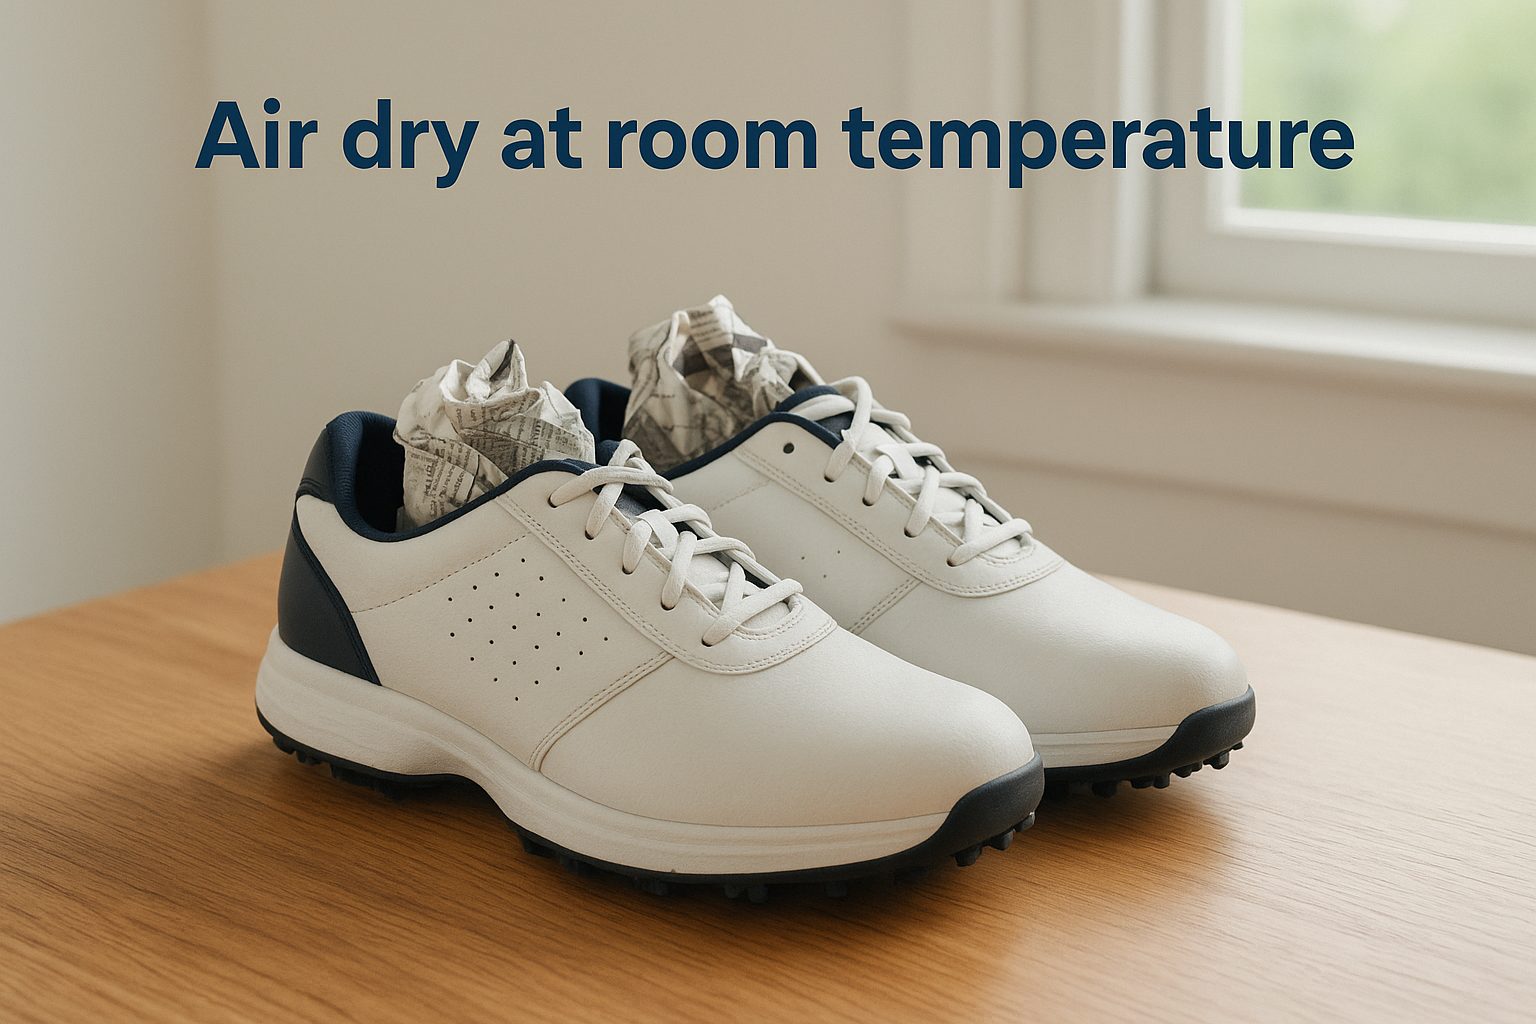
Replace the paper after two hours if it feels saturated. Your shoes typically need 12 to 24 hours to dry completely depending on how wet they became during cleaning. Never use a hairdryer or tumble dryer, as rapid drying damages materials irreversibly.
Patience during drying prevents the most common causes of premature golf shoe failure.
Apply protection treatments
Spray waterproofing treatment on synthetic and mesh shoes once they are fully dry to restore water resistance that cleaning removes. Apply leather conditioner or shoe cream to leather uppers using a soft cloth in circular motions. These treatments prevent cracking and maintain flexibility.
Store in cool, dry conditions
Keep your golf shoes in a cupboard or wardrobe rather than in your car boot where temperature fluctuations cause deterioration. Use shoe trees to maintain shape during storage. This prevents toe boxes from collapsing and preserves the shoes' original fit for your next round.

Wrap up and next steps
You now know how to clean golf shoes properly for any material type. Following these steps after each round keeps your footwear performing at its best and extends its lifespan significantly. The process takes less than 20 minutes and uses supplies you already have at home.
Set a cleaning routine for yourself by keeping a dedicated shoe cleaning kit in your golf bag or garage. Clean your shoes within an hour of finishing your round when dirt is still soft. When your current pair reaches the end of its life despite proper care, browse the latest golf shoes at More Sports for quality replacements at competitive prices.