 Free UK Delivery On Orders Over £25
 90 Day Returns
How To Regrip Golf Clubs At Home: Step-By-Step Tools & Tips
RYWorn golf grips can quietly sabotage your game. When the rubber becomes slick or hard, your hands start compensating mid-swing, leading to inconsistent shots and unnecessary tension. Learning how to regrip golf clubs at home is a straightforward skill that saves you money and keeps your equipment performing at its best. At More Sports, we supply golfers across the UK and EU with quality grips from top brands like Golf Pride and Lamkin, so we know how much of a difference fresh rubber can make.
This guide walks you through the entire regripping process, from gathering the right tools to securing your new grips with confidence. You'll find clear, step-by-step instructions suitable for beginners, along with practical tips that professionals use to get consistent results. Whether you're refreshing a full set or replacing a single worn grip, you'll have everything you need to complete the job properly at home.
Before you start: grips, tools, safety
Gathering the right equipment before you begin makes the entire process smoother and prevents frustrating delays mid-job. You'll need new grips that match your club shaft diameter (standard or midsize), along with grip tape, solvent, and a few basic tools that most golfers already have at home. Taking ten minutes to prepare your workspace properly means you can regrip an entire set in under an hour without rushing or making costly mistakes.
Choosing the right grips
Your new grips need to fit both your hands and your shafts. Standard grips suit most golfers with average hand sizes, while midsize or jumbo options work better for larger hands or arthritic joints. Check your current grips for any manufacturer labels that show the size, or measure the butt diameter with callipers if you're unsure. More Sports stocks grips from Golf Pride, Lamkin, and other trusted brands that cater to different feel preferences, from tacky rubber compounds to cord-backed textures for wet conditions.
Essential tools and materials
You need five core items to complete this job properly. Double-sided grip tape (2-inch width) wraps around the shaft and creates a secure bond, while mineral spirits or proprietary grip solvent activates the adhesive and lets you slide the grip into position. A sharp utility knife or hook blade removes old grips cleanly, and a vice with rubber clamps holds your clubs steady without damaging the shaft. Finally, keep a cloth or paper towels nearby for cleaning and wiping excess solvent.
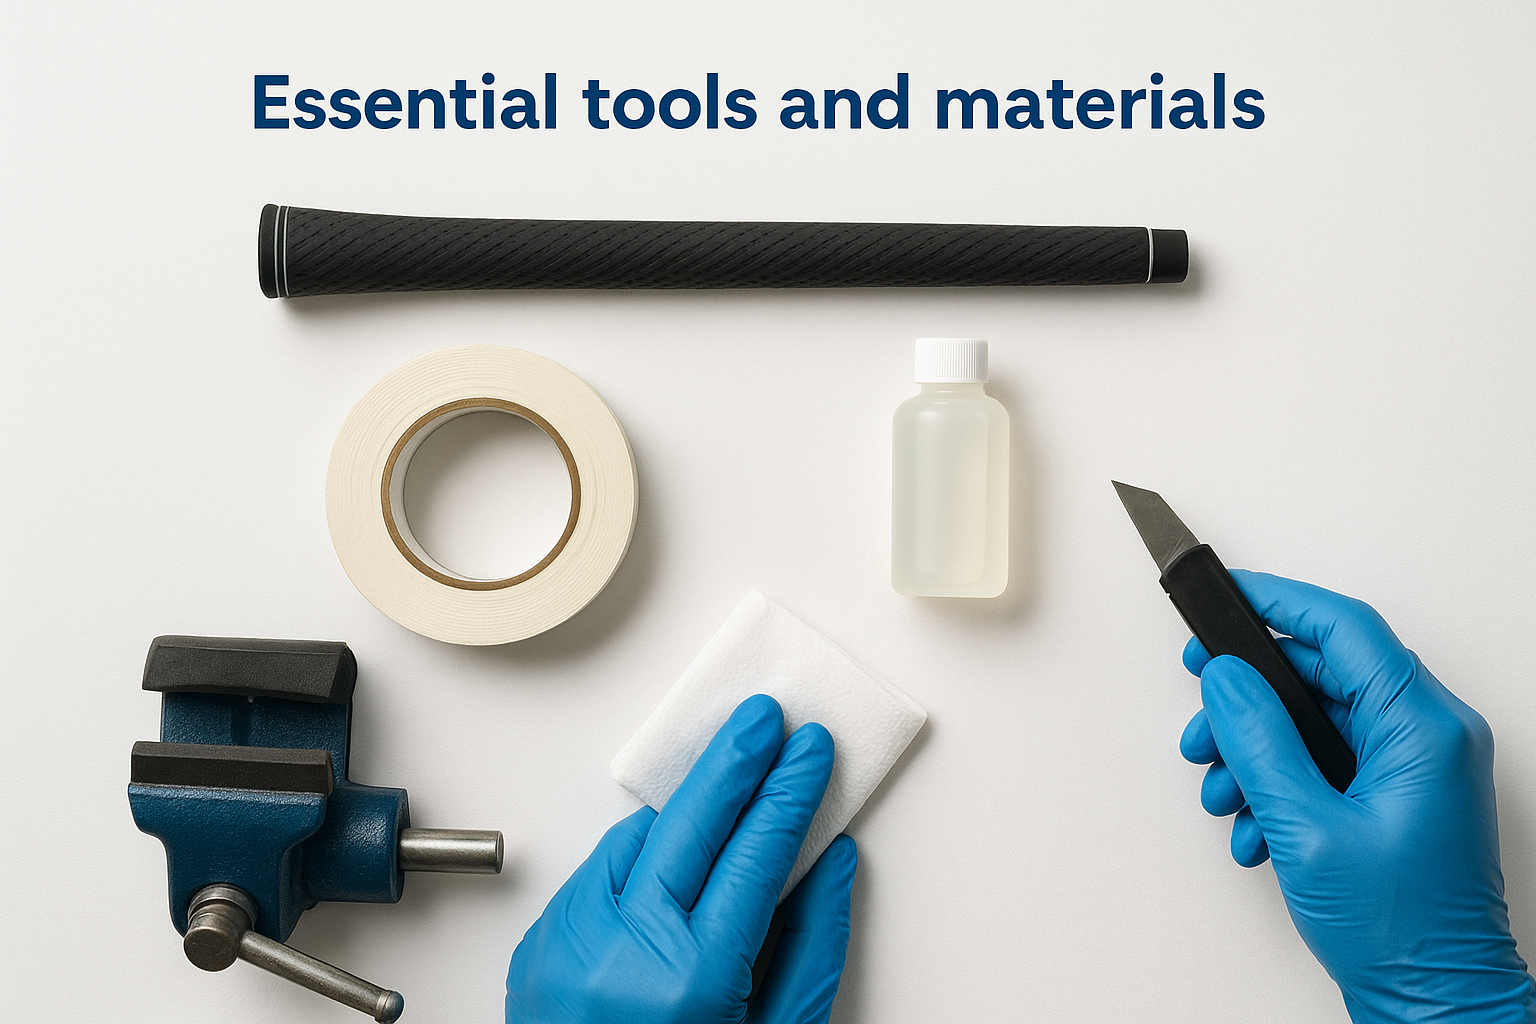
Safety precautions
Grip solvents are flammable and produce strong fumes, so work in a well-ventilated space such as a garage with open doors or an outdoor area away from ignition sources. Wear safety glasses when cutting old grips off, as the blade can slip and small pieces of rubber may fly up towards your face. Keep solvent away from skin contact by using disposable gloves, and never smoke or use heat sources near your work area.
Always secure your club firmly in a vice before applying any cutting force to prevent the shaft from moving unexpectedly.
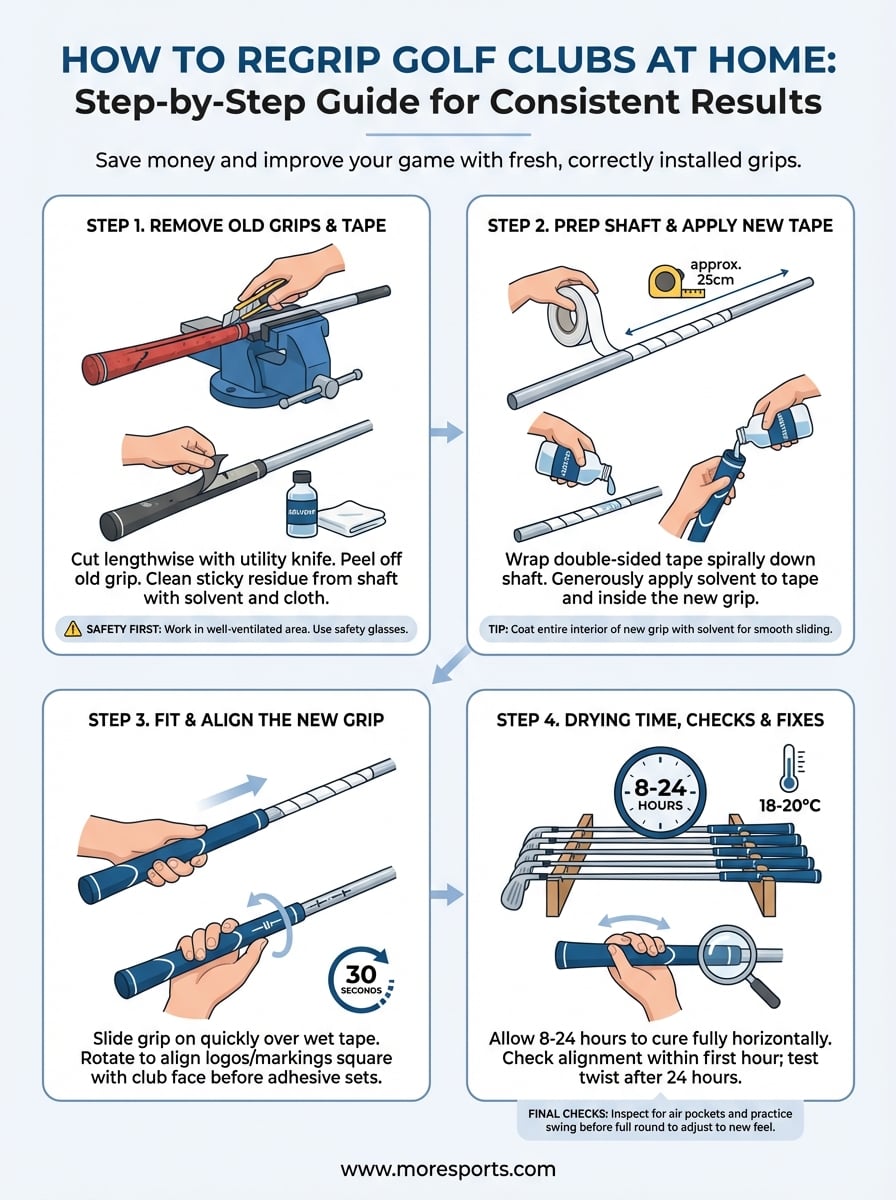
Step 1. Remove old grips and tape
Removing your old grips correctly prevents damage to the shaft and sets you up for a clean installation. You'll cut through the grip lengthwise with a sharp utility knife or hook blade, then peel away all the old tape underneath to create a smooth surface. This first step in learning how to regrip golf clubs takes the most care, as a slip with the blade can scratch your shaft or, worse, cut into graphite fibres that weaken the club permanently.
Cutting off the grip safely
Secure your club in the vice with the grip end pointing towards you, then position your blade at the top of the grip where it meets the shaft. Run the knife down the length of the grip in one smooth motion, applying just enough pressure to cut through the rubber without touching the shaft beneath. Peel the grip away once you've made the full cut, and discard it immediately to keep your workspace clear.
Removing tape residue
Old grip tape leaves sticky residue that prevents your new grip from bonding properly. Pour a small amount of solvent onto a cloth and wipe the entire shaft section where the grip sat, working in circular motions until all adhesive comes off. Stubborn patches may need a plastic scraper, but never use metal tools that can gouge the shaft surface.
A perfectly clean shaft ensures your new grip slides on smoothly and adheres evenly without lumps or air pockets.
Step 2. Prep the shaft and apply new tape
Your shaft needs fresh tape to create a secure bond between the metal and your new grip. Start by measuring where your grip will sit on the shaft, then cut a piece of double-sided grip tape roughly 25cm long to cover this area completely. This step in how to regrip golf clubs determines whether your grip stays firm or starts twisting after a few rounds, so take your time and ensure full coverage without gaps or wrinkles.
Wrapping the tape properly
Peel back about 2cm of the backing paper from your grip tape, then press the tape end onto the shaft approximately 1cm below where your grip will finish. Wind the tape in a spiral pattern down the shaft, overlapping each turn by about half the tape width to avoid any exposed shaft showing through. Keep the tape taut but not stretched as you wrap, and press it down firmly to eliminate air bubbles. Once you reach the bottom, trim any excess tape and smooth the edges with your fingers.
Proper tape coverage prevents the grip from rotating during your swing, which can throw off your club face alignment at impact.
Applying solvent generously
Pour solvent directly onto the taped shaft until it runs freely, then quickly cap the grip's open end with your thumb and pour more solvent inside the grip itself. Shake the grip to coat the entire interior surface, which lets you slide it on smoothly without friction that could tear the rubber or misalign your installation.
Step 3. Fit and align the new grip
Working quickly matters now because the solvent starts evaporating within seconds. You need to slide the new grip onto the shaft in one smooth motion, then align it properly before the adhesive begins to set. This critical stage in how to regrip golf clubs demands confidence and speed, but you'll have enough time to make small adjustments if you prepared your workspace properly in the earlier steps.
Sliding the grip on quickly
Hold the grip at its open end and position it directly over the taped shaft, then push firmly and steadily until the grip reaches its final position. The solvent acts as a lubricant, so the grip should glide on easily without resistance. If you feel the grip sticking or stopping halfway, add more solvent immediately rather than forcing it, which can tear the rubber or damage the shaft.
Aligning the grip correctly
Most grips have alignment marks, logos, or ribbed patterns that need to match your natural hand position. Rotate the grip gently until these features sit square with the club face, checking from multiple angles to ensure everything lines up. You have roughly 30 seconds to make adjustments before the solvent dries enough to lock the grip in place, so work methodically but don't hesitate.
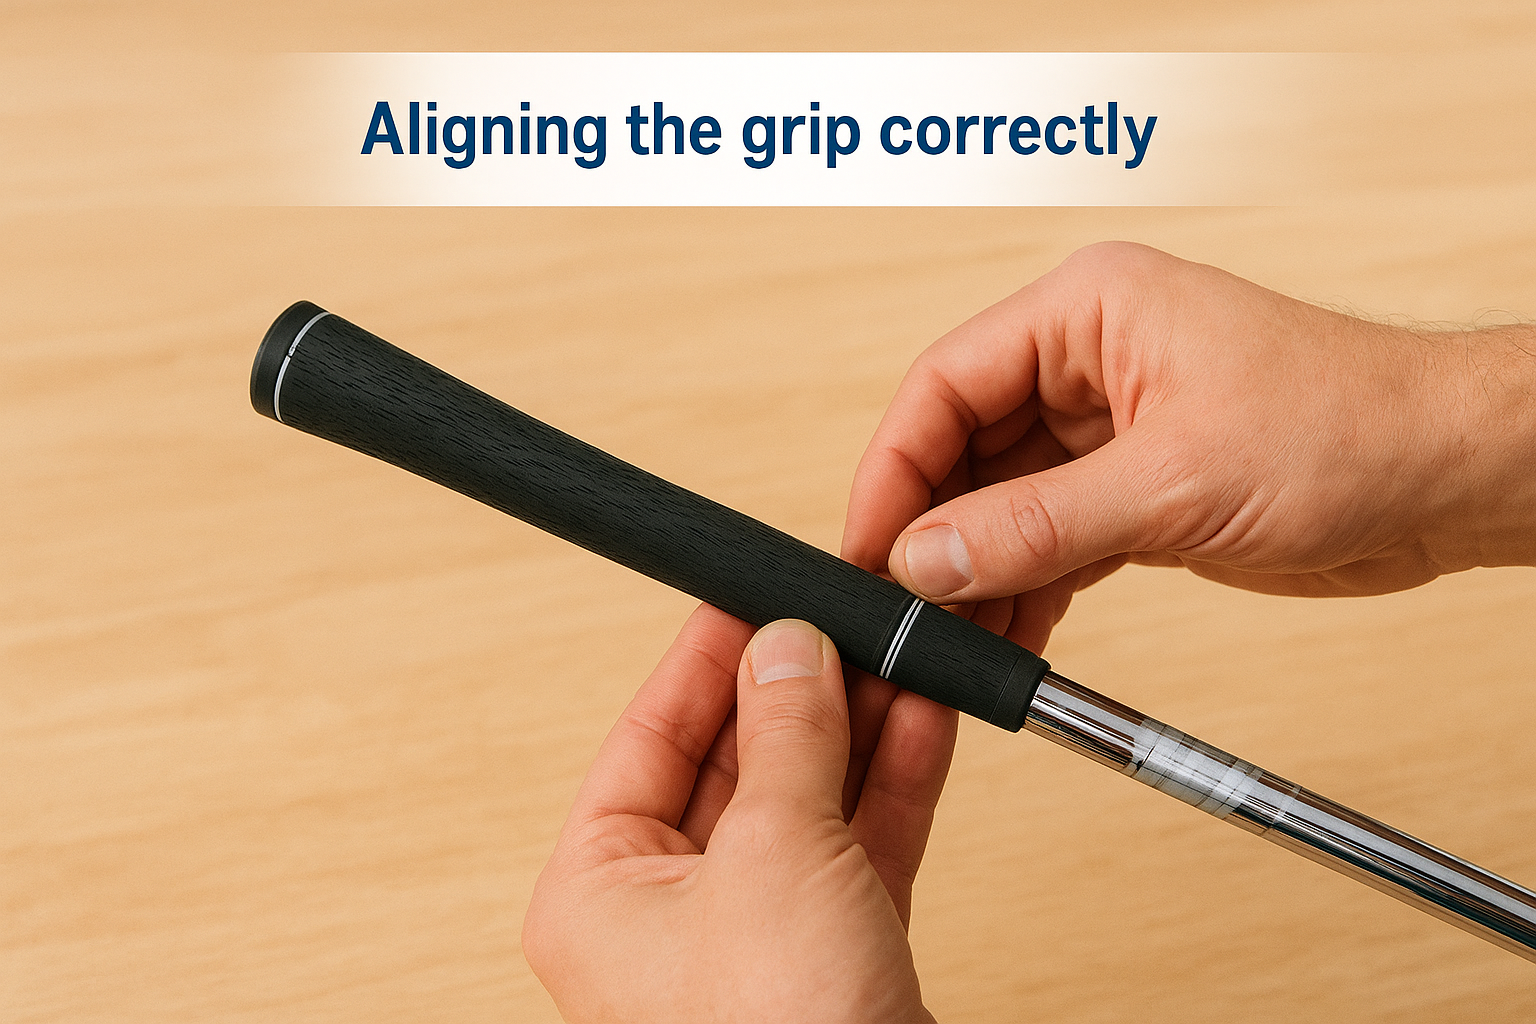
A properly aligned grip helps your hands return to the same position on every swing, which builds consistency and confidence in your ball striking.
Step 4. Drying time, checks, and fixes
Patience during the drying phase prevents all your careful work from coming undone. Your newly installed grip needs at least 8 hours to cure fully before you swing the club, though some professionals recommend waiting 24 hours for maximum bond strength. This final stage of how to regrip golf clubs tests your discipline, but rushing onto the course with wet grips can cause them to twist or slide during your swing.
Waiting for the adhesive to set
Place your freshly gripped clubs in a horizontal position on a rack or towels where they won't roll or lean against anything. Solvent needs to evaporate completely for the tape's adhesive to activate and create a permanent bond. Room temperature affects drying time, so clubs stored in cold garages may need longer than those kept indoors at 18-20°C.
Never test a new grip by twisting it forcefully before the full curing time has passed, as you'll break the bond you've just created.
Spotting and correcting mistakes
Check each grip after 30 minutes for alignment issues or visible air pockets beneath the rubber. Minor misalignments can still be corrected within the first hour by adding fresh solvent and rotating the grip carefully. Larger problems like torn rubber or exposed tape require complete removal and reinstallation with a new grip and fresh tape.
Final checks before your next round
Give your clubs a final inspection 24 hours after installation to confirm the grips have cured properly. Twist each grip gently with moderate pressure to check for any movement, and run your hand along the entire surface to feel for air pockets or rough edges that might affect your hold during play. These quick checks take less than five minutes but catch any potential issues before you're standing on the first tee with your playing partners watching.
Test your newly gripped clubs with a few practice swings in your garden or at your local range before committing to a full round. The fresh rubber will feel noticeably different from your worn grips, possibly slightly tackier or thicker, so give yourself time to adjust your hand pressure. Once you're confident with the new feel, you're ready to play with equipment that performs exactly as it should.
Now that you've mastered how to regrip golf clubs at home, browse our full selection of golf grips and accessories at More Sports to keep your clubs performing at their best throughout every season.