 Express Tracked UK Delivery On 1000s of Items
 90 Day Returns
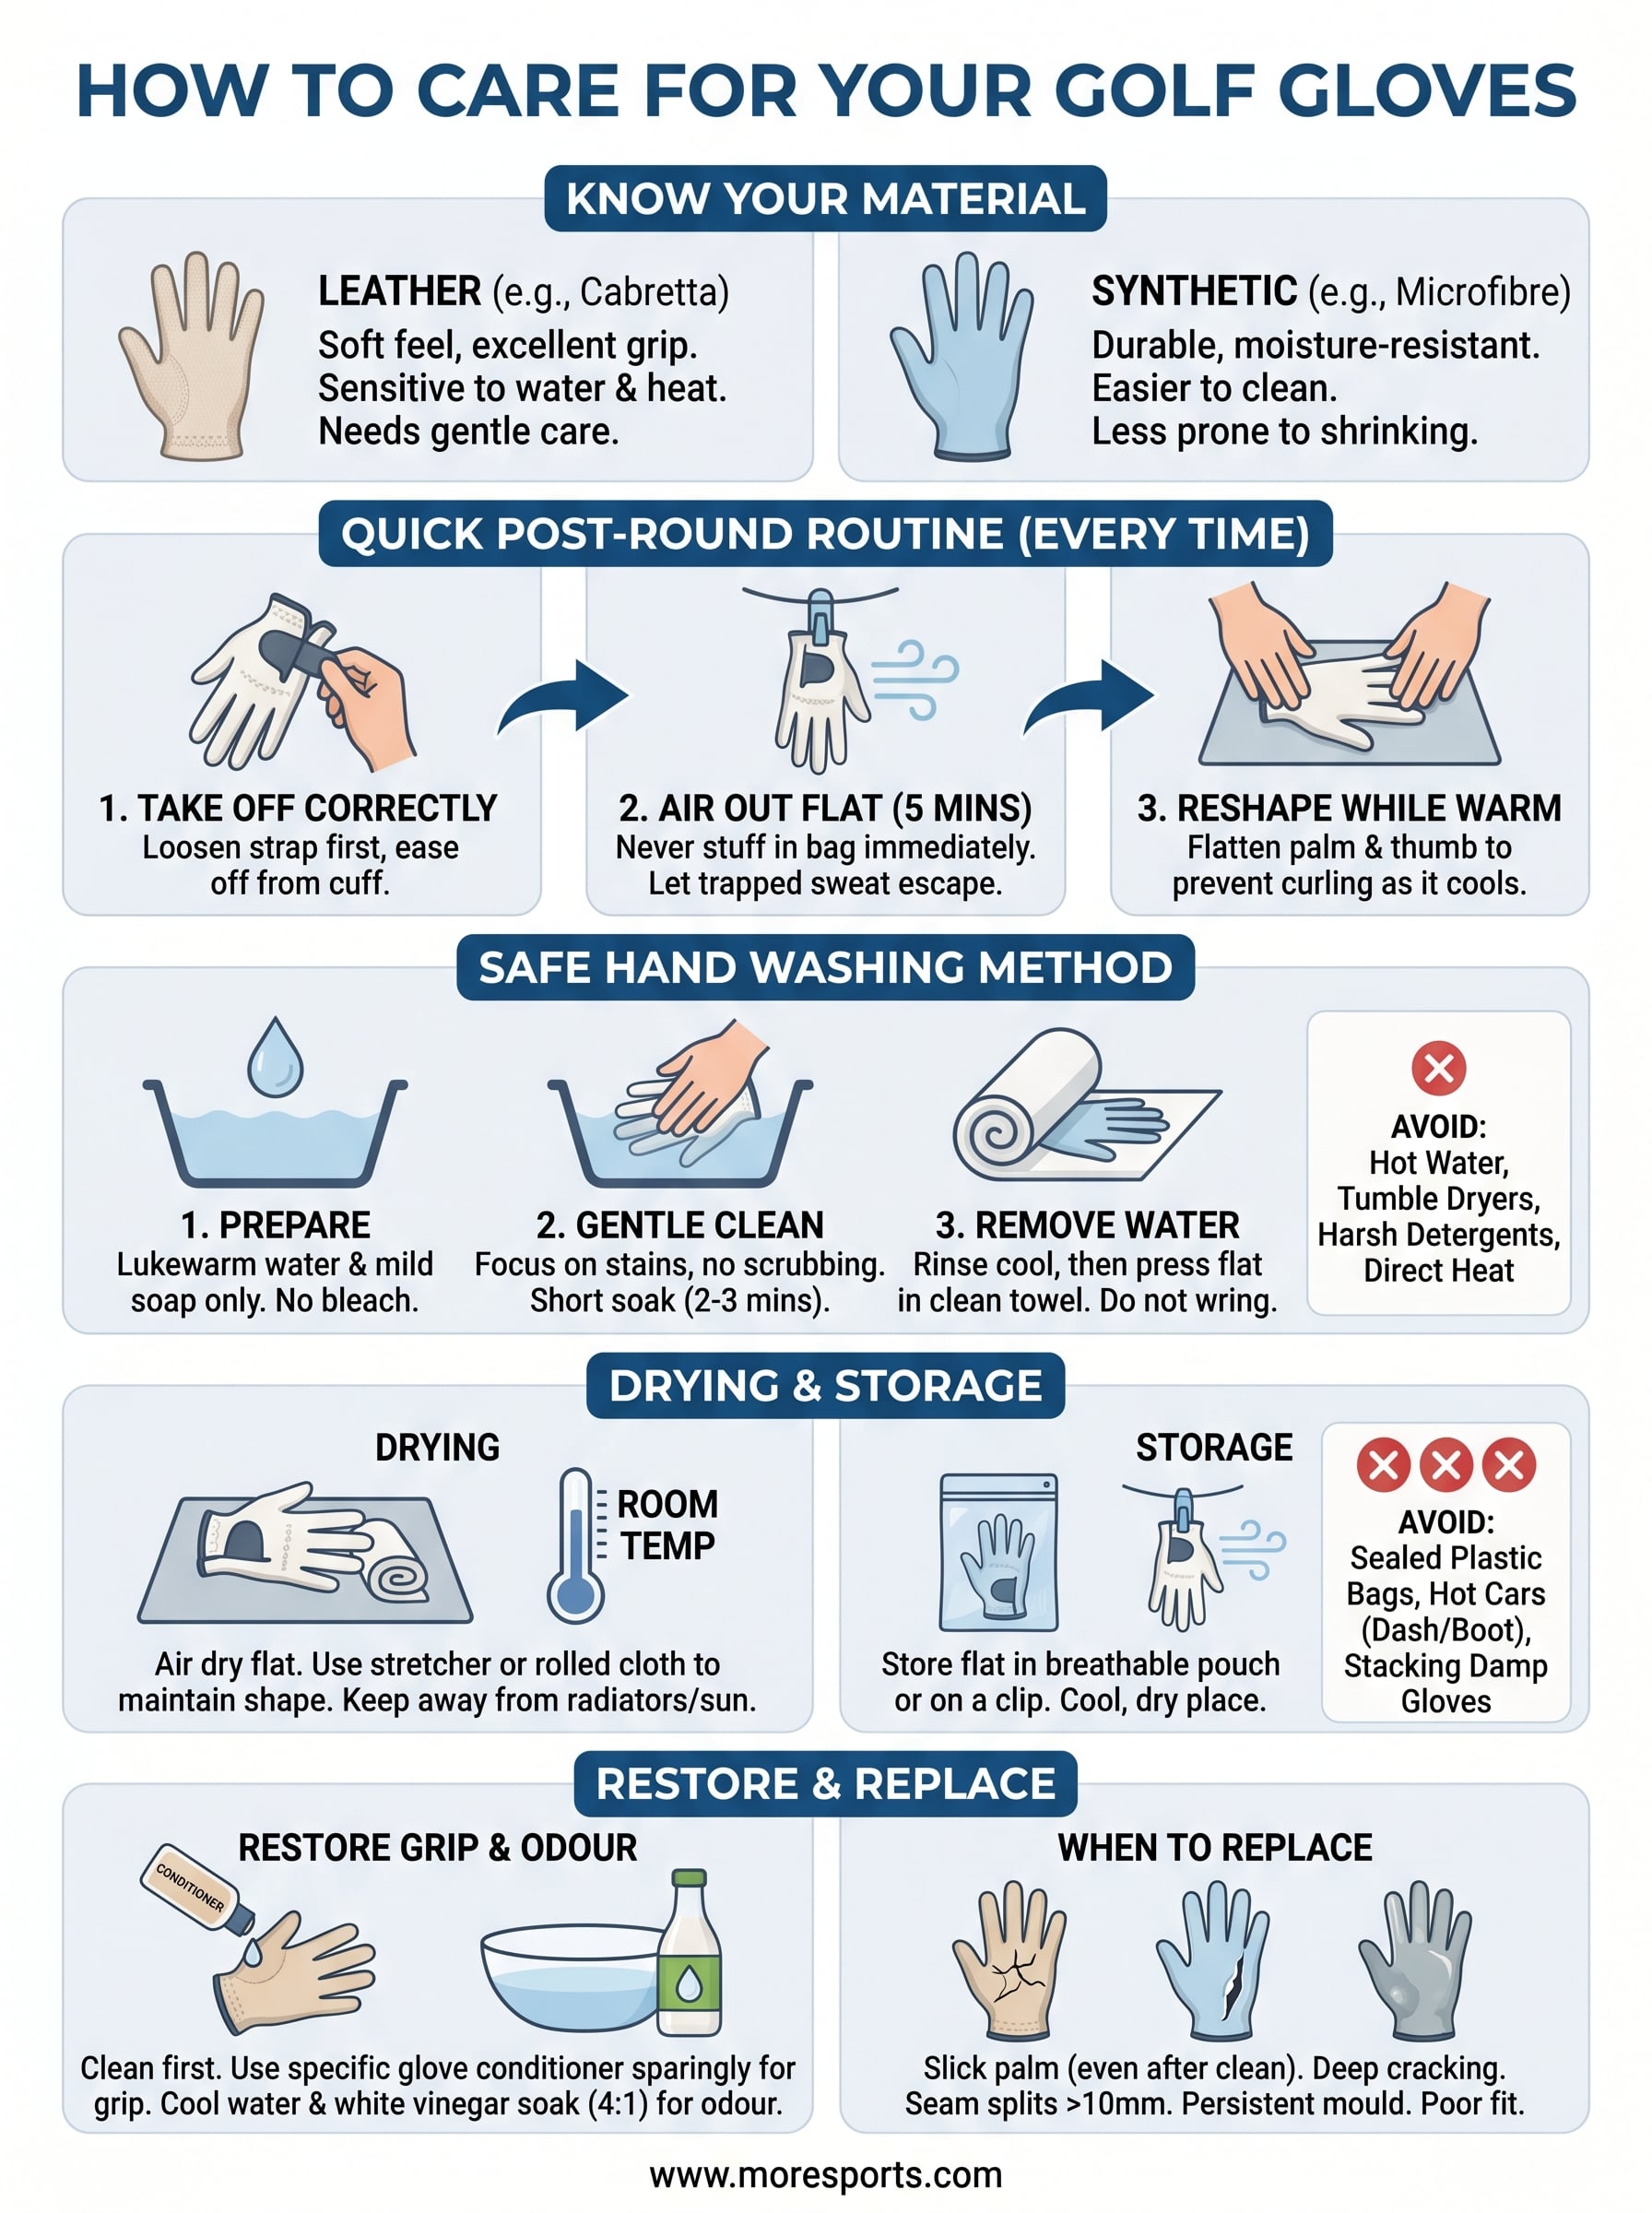
How To Care For Golf Gloves: Clean, Dry, Store, Restore Grip
RYA quality golf glove can make a real difference to your grip, control, and confidence on the course, but only if you look after it properly. Knowing how to care for golf gloves is the difference between a glove that lasts a full season and one that turns stiff, slippery, or cracked after a few rounds. Whether you've invested in a premium leather glove or a synthetic all-weather option, the way you clean, dry, and store it directly affects its performance and lifespan.
Most golfers replace their gloves far more often than they need to. The usual culprits? Tossing a sweaty glove into the bottom of a bag, balling it up, or leaving it in the car on a hot day. These habits break down materials fast, and they're easy to fix once you know what to do. With a few simple routine steps, you can keep your gloves soft, grippy, and ready to perform round after round.
At MoreSports, we stock golf gloves from brands like FootJoy, TaylorMade, and Under Armour, and we want you to get the most out of every pair. That's why we've put together this complete guide covering everything from cleaning and drying techniques to proper storage, grip restoration, and knowing when it's finally time for a replacement. Let's get into it.
What you need to know before you start
Before you dive into any cleaning or storage routine, it helps to understand what your glove is made of and why it behaves the way it does. Golf gloves take a beating every round - they absorb sweat, grip a hard club handle through dozens of swings, and often get shoved into a bag immediately after use. Understanding the basics of glove materials and care principles gives you a solid foundation before you start any cleaning or maintenance process. Rushing in without this context is where most golfers cause accidental damage.
The two main glove materials
The material your glove is made from changes how you should treat it. Leather gloves, typically made from cabretta sheepskin, offer a soft, natural feel and excellent grip, but they're more sensitive to water, heat, and rough handling. Getting a leather glove soaking wet and leaving it to dry on its own almost guarantees it will come out stiff and shrunken - and at that point, there's very little you can do to bring it back fully.
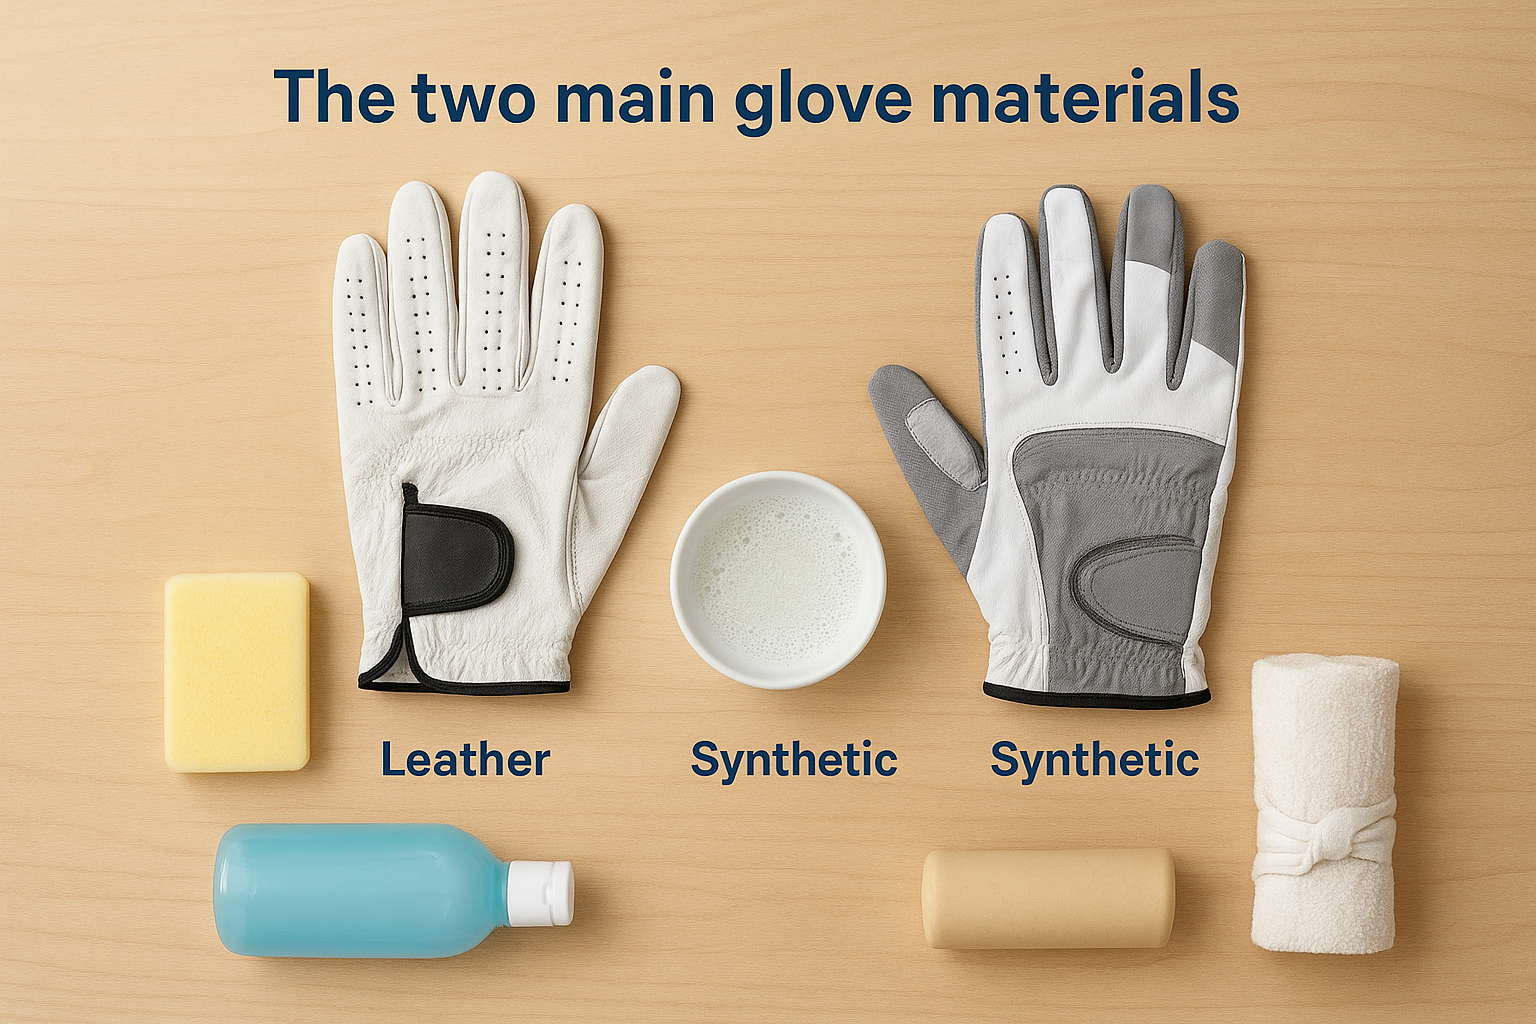
Synthetic gloves are made from materials like microfibre and elastane. They're more durable, easier to clean, and generally handle moisture better than leather. Some gloves combine both materials, with leather on the palm for grip and synthetic panels on the fingers for breathability and flexibility. Knowing which category your glove falls into before you start caring for it means you won't accidentally damage it by using the wrong method or product.
If you're unsure what material your glove is made from, check the label inside the cuff or look up the product page from the manufacturer.
Why routine beats repair
Most glove damage doesn't happen suddenly. It builds up gradually through repeated rounds of neglect: a bit of dried sweat here, a few hours stuffed in a bag there. By the time a glove feels stiff or smells bad, the material has already deteriorated to a point where recovery is limited. This is exactly why learning how to care for golf gloves is really about building small, consistent habits rather than trying to rescue a glove that's already past its best.
Think of it like looking after a good pair of leather shoes. You wouldn't leave them soaked and expect them to stay supple. The same logic applies to your glove. A two-minute post-round routine is worth far more than an intensive cleaning session every few weeks, because you're stopping damage before it sets in rather than trying to reverse it later.
What you'll need
You don't need specialist equipment to look after your gloves properly. Most of what you need is already at home, and nothing on this list will cost you much. Having these items ready before you start means you won't cut corners mid-process.
Here's what to gather before you begin:
| Item | Purpose |
|---|---|
| Mild soap or gentle detergent | Cleaning without stripping natural oils from leather |
| Lukewarm water | Safe for both leather and synthetic materials |
| Soft cloth or sponge | Gentle surface cleaning without abrasion |
| Clean dry towel | Removing excess moisture after washing |
| Glove stretcher or rolled-up cloth | Maintaining shape during drying |
| Leather conditioner (for leather gloves) | Restoring suppleness after cleaning |
| Breathable storage bag or glove clip | Keeping gloves flat and aired between rounds |
Avoid harsh detergents, hot water, and tumble dryers at every stage. These break down both leather fibres and synthetic materials quickly, and they're the most common reason gloves come out of a cleaning attempt in worse condition than when they went in.
Step 1. Identify your glove type and damage
Before you clean, condition, or store anything, you need to know exactly what you're dealing with. Treating a leather glove the same way you'd treat a synthetic one is one of the most common mistakes golfers make, and it often leads to more damage than the original problem. Take two minutes to properly assess your glove before doing anything else - this single step determines which cleaning methods are safe to use and which ones could ruin the material permanently.
Check what material you're working with
Look at the label inside your glove's cuff. Most manufacturers print the material composition clearly there. If it says cabretta leather or simply "leather", treat it with extra care around water and heat. If it lists microfibre, polyester, or elastane, you have a synthetic glove that handles more direct cleaning with a lower risk of shrinkage or stiffening. Some gloves use a hybrid construction, with a leather palm and synthetic panels on the fingers or back of the hand, so read the label fully rather than making assumptions based on how the glove feels.
When in doubt, treat your glove as if it's leather. It's the safer approach that protects the more sensitive material from accidental damage.
Spot the signs of damage early
Knowing what damage looks like before it becomes irreversible is central to understanding how to care for golf gloves properly. Run through this quick checklist every few rounds to catch problems while they're still fixable.
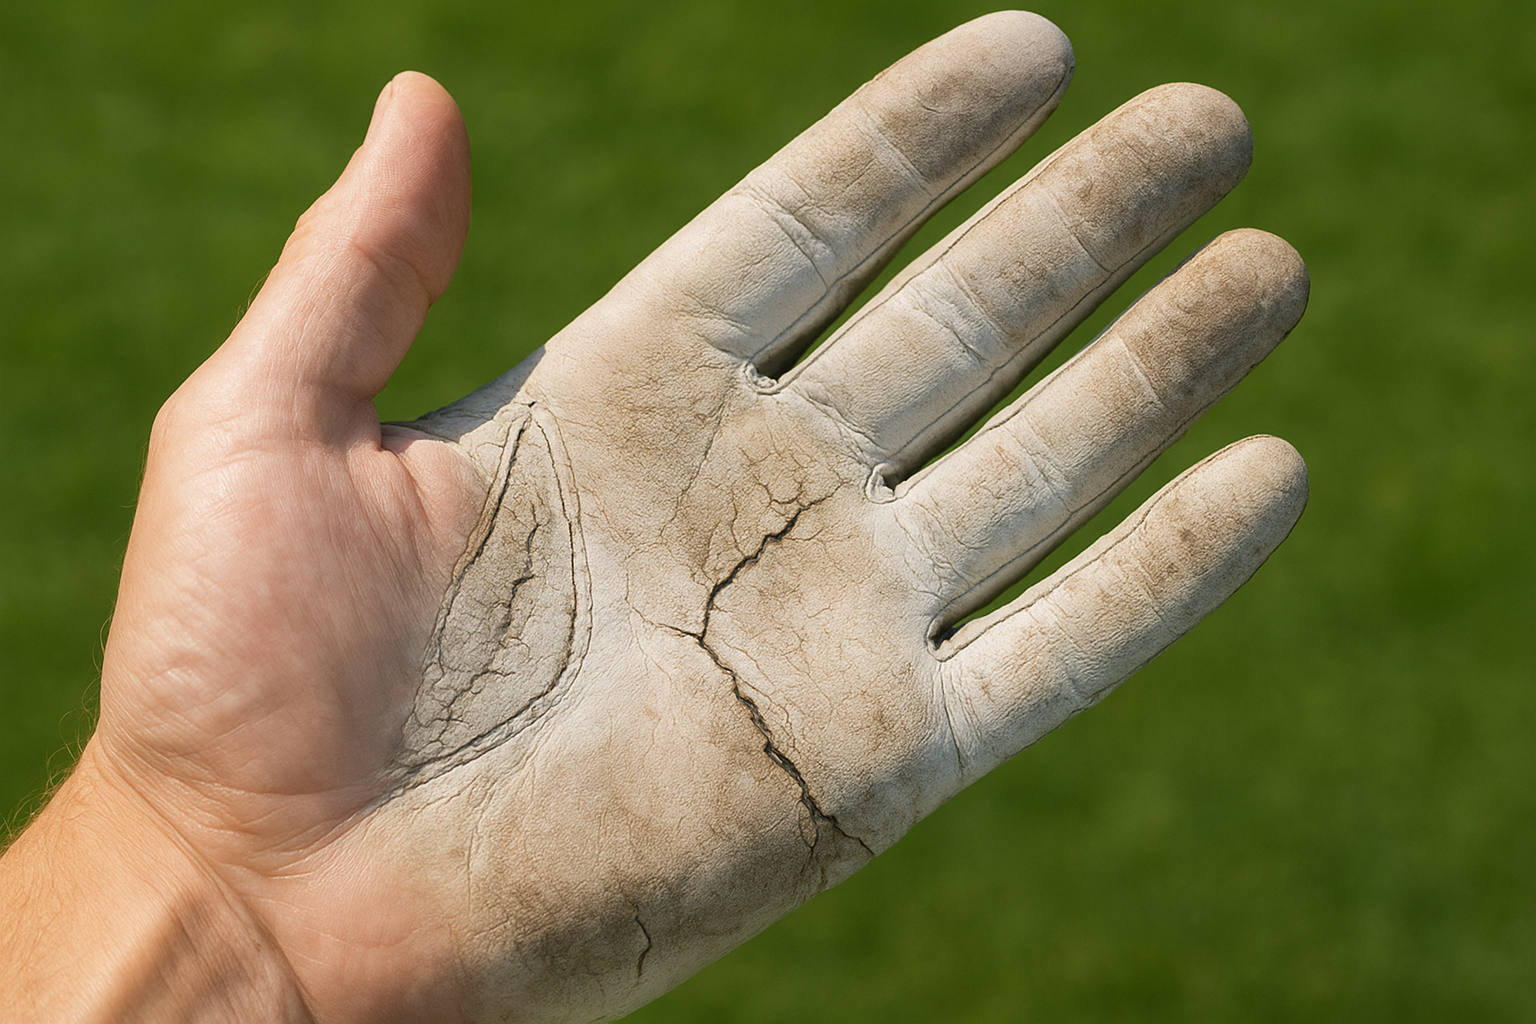
| Sign | What it means | Action needed |
|---|---|---|
| Stiffness across the palm | Dried sweat and lack of conditioning | Clean and condition immediately |
| White residue or discolouration | Salt deposits from perspiration | Gentle wash with lukewarm water |
| Cracking on the palm or thumb | Leather drying out from heat or neglect | Condition with leather balm |
| Slippery grip on the palm | Surface wear or material breakdown | Assess whether grip can be restored or replace |
| Visible mould or strong odour | Poor drying and storage habits | Deep clean and air out fully |
| Torn or fraying seams | Mechanical wear from use | Minor tears are manageable; major tears mean replacement |
Focus on the thumb, index finger, and palm area first, since these zones take the most friction during a swing. Heavy cracking or discolouration in these specific areas usually means the glove was stored damp or went without conditioning for too long. Catching this early means you can still recover the glove rather than buying a replacement ahead of schedule.
Step 2. Do a quick post-round routine every time
A post-round routine doesn't need to take more than two or three minutes, but it's the single most effective habit you can build when learning how to care for golf gloves. The damage that shortens a glove's life almost always happens right after a round ends, not during it. Sweat, heat, and being balled up inside a bag are the three main culprits, and a short routine at the end of each session eliminates all three before they have time to cause lasting harm to the material. Build this into your end-of-round habits the same way you clean your clubs before heading home.
Take the glove off correctly
Most golfers peel their glove off by grabbing the fingers and pulling hard, which stresses the seams and stretches the material out of shape over time. Instead, loosen the Velcro strap first, then gently ease the glove off from the cuff downwards, turning it slightly inside out as you go. This keeps the palm area in better condition and reduces unnecessary tension on the stitching around the fingers and thumb, where the seams are under the most stress during a round.
Never pull your glove off by a single finger. It's one of the easiest ways to tear a seam that can't be repaired.
Air it out before anything else
Once the glove is off, resist the urge to stuff it straight into your bag. Give it at least five minutes of open air before it goes anywhere. Turn it right-side out and lay it flat on top of your bag, or hang it from a zip pull so moisture can escape freely. Trapped sweat is the main reason gloves turn stiff and crusty between rounds - most golfers blame general wear, but it's usually dried perspiration that set into the fibres because the glove got packed away too quickly. Five minutes of airflow makes a significant difference to how the glove feels the next time you pick it up.
Reshape it while it's still warm
While the glove is still slightly warm and pliable from your hand, spend ten seconds flattening it out by pressing it gently between your palms or smoothing it across a flat surface. This stops the leather or synthetic material from setting in a curled or crumpled position as it cools and dries. Focus on the palm and the thumb area, since these zones curve the most during your swing and are the most likely to dry awkwardly if left unchecked. Reshaping at this stage takes seconds; correcting a glove that has already dried badly takes considerably longer and rarely works completely.
Step 3. Hand wash a glove without ruining it
When a quick wipe-down after a round isn't enough, a proper hand wash is the safest way to clean a golf glove without causing shrinkage, stiffening, or colour bleed. Machine washing is not an option - the heat, agitation, and spin cycle will destroy both leather and most synthetic gloves within a single wash. Understanding how to care for golf gloves properly means knowing that hand washing is a careful, controlled process rather than a quick scrub under the tap.
Prepare before you wet anything
Getting the process right starts before the glove touches any water. Remove any loose dirt or grass from the surface using a soft, dry cloth - this stops you from grinding debris further into the material once it gets wet. Check the label inside the cuff one more time to confirm the material, because leather gloves need extra attention around water temperature and contact time compared to synthetic ones. Never use hot water - lukewarm is the maximum, and cooler is better for leather.
Using water that is too hot is one of the most common reasons leather gloves come out of washing stiff and shrunken - lukewarm water prevents this entirely.
Wash it step by step
Follow this sequence precisely to clean your glove without causing damage. Each step in order matters - skipping ahead or rushing through the rinse stage is where most avoidable problems occur. Treat the process as a short but deliberate routine rather than a fast chore.
- Fill a basin with lukewarm water and add roughly half a teaspoon of mild soap. Avoid anything containing bleach, strong detergents, or fragrance additives.
- Submerge the glove and gently work the soapy water into the palm, thumb, and finger areas using your fingertips. Light pressure only.
- Focus on the areas with visible staining or salt residue, but do not scrub. Use small circular motions with a soft cloth or sponge.
- Rinse the glove under cool running water until no soap remains. Squeeze gently from the cuff towards the fingertips - never wring or twist.
- Press the glove flat against a clean towel and roll the towel up to absorb excess water without distorting the shape.
Synthetic gloves can tolerate slightly more water pressure during rinsing than leather, but the core method stays the same for both. Do not leave any glove soaking in water for longer than two or three minutes, as prolonged submersion weakens seams and softens the material in ways that make it prone to tearing during your next round.
Step 4. Dry your glove the right way
Drying is where most golfers cause the most irreversible damage. After a wash or a rain-soaked round, the instinct is to speed up the process using a radiator, tumble dryer, or direct sunlight. Each of these strips moisture from the material too fast, causing leather to crack and synthetic fibres to warp or stiffen permanently. Understanding how to care for golf gloves means treating the drying stage with the same care as the washing stage. Get this wrong and the glove you carefully hand washed will come out in worse condition than before you started.
What to avoid during drying
Knowing what to steer clear of is just as important as knowing the correct technique. These heat sources and handling mistakes are the most common causes of permanent glove damage at the drying stage, and most of them feel like they should work because they speed things up.
| Avoid | Why it causes damage |
|---|---|
| Tumble dryer | High heat and tumbling action shrinks leather and warps synthetics |
| Direct radiator heat | Dries unevenly, causes cracking and stiffness across the palm |
| Direct sunlight | UV and heat combined dry out natural oils and fade colour |
| Wringing or twisting | Distorts the shape and puts stress on stitched seams |
| Hairdryer on hot setting | Concentrates heat in one spot, causing uneven shrinkage |
Never place your glove near any heat source to speed up drying - slow, natural air drying at room temperature is the only safe method for both leather and synthetic materials.
How to dry it properly
Once you've removed excess moisture with a clean towel using the rolling method from the previous step, lay the glove flat on a dry surface in a well-ventilated space at room temperature. Smooth it into its natural hand shape as you lay it down, paying particular attention to the thumb and palm, which are the areas most prone to drying awkwardly if left unchecked. Flip the glove over after around 30 minutes so both sides dry at an even rate.
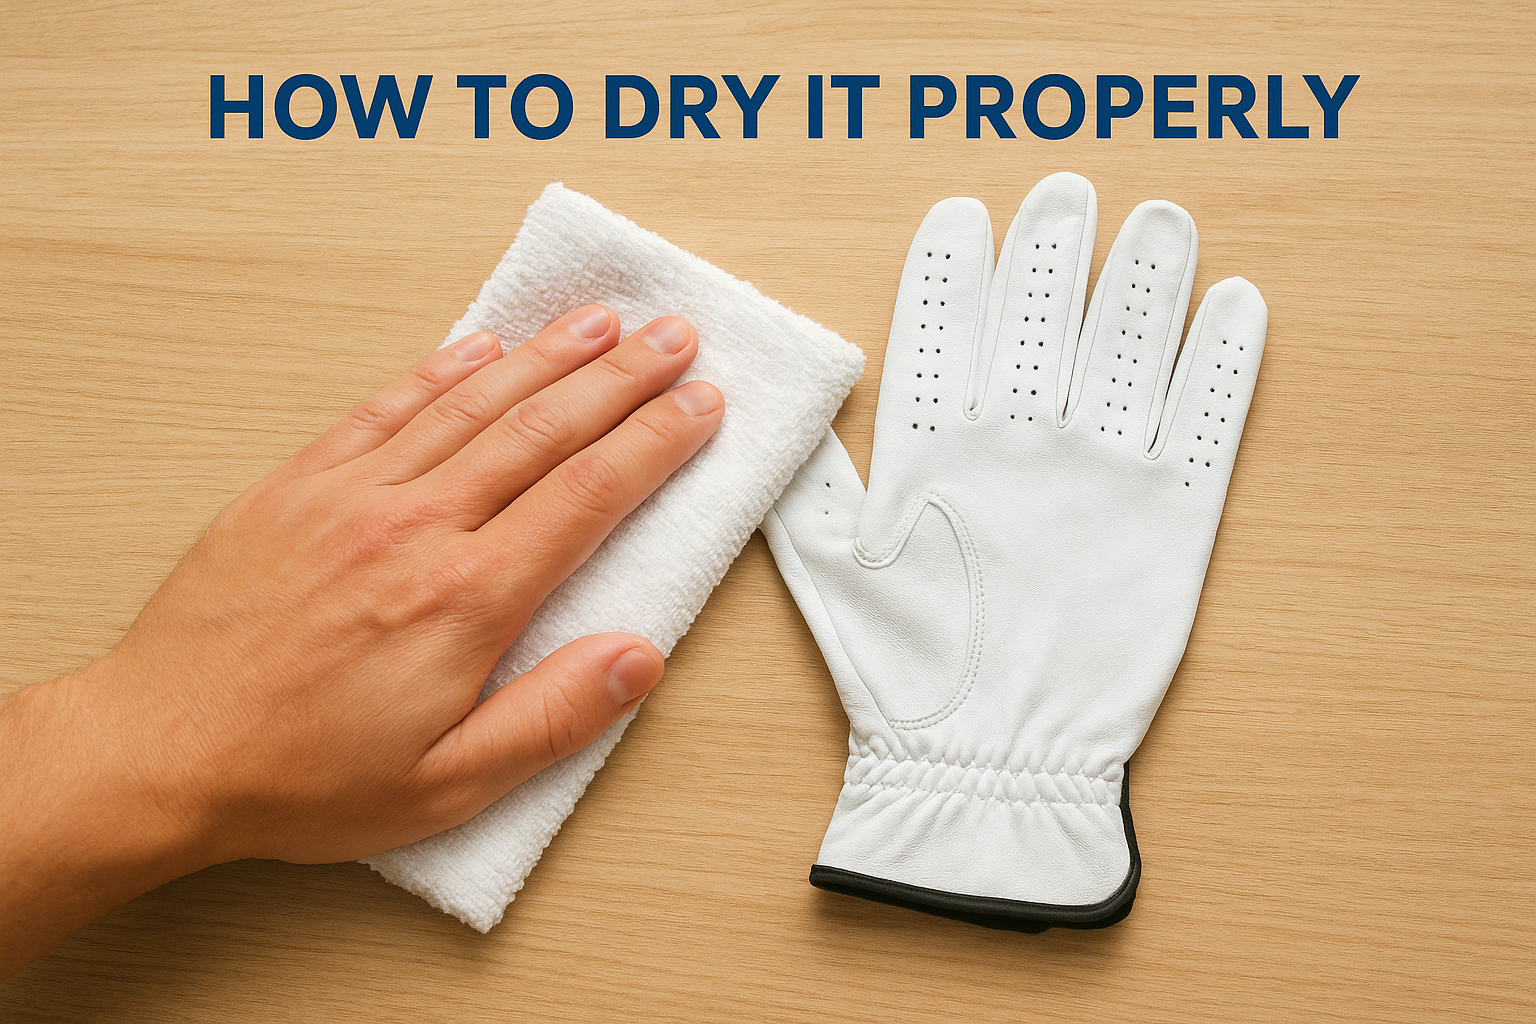
Maintaining the natural shape of the glove while it dries makes a noticeable difference to how it fits when you pick it up again. Slide a glove stretcher inside it, or loosely fill it with a clean rolled cloth, to support the palm from the inside and prevent the fingers from curling inward as the material contracts slightly. Allow a full two to four hours for a leather glove to dry completely before storing or using it again. Synthetic gloves dry faster but still benefit from exactly the same process.
Step 5. Store it to prevent stiffness and mould
Storage is where many golfers undo all the good work they put into cleaning and drying. Knowing how to care for golf gloves properly means treating storage as seriously as any other step, not as an afterthought. A glove that comes out of a thorough wash and drying process but then gets balled up and tossed into a closed, damp bag pocket will turn stiff or develop mould within days, especially in warmer or more humid conditions.
Keep it flat and allow airflow
The position your glove sits in between rounds directly affects its shape and flexibility. Always store your glove flat rather than folded or crumpled, so the palm and finger areas maintain their natural form. A simple and effective method is to use a glove clip or carabiner attached to the outside of your bag, which keeps the glove flat and exposed to open air at all times. Alternatively, lay it flat inside a breathable mesh pouch rather than a sealed plastic bag, which traps moisture and creates exactly the conditions mould needs to grow.
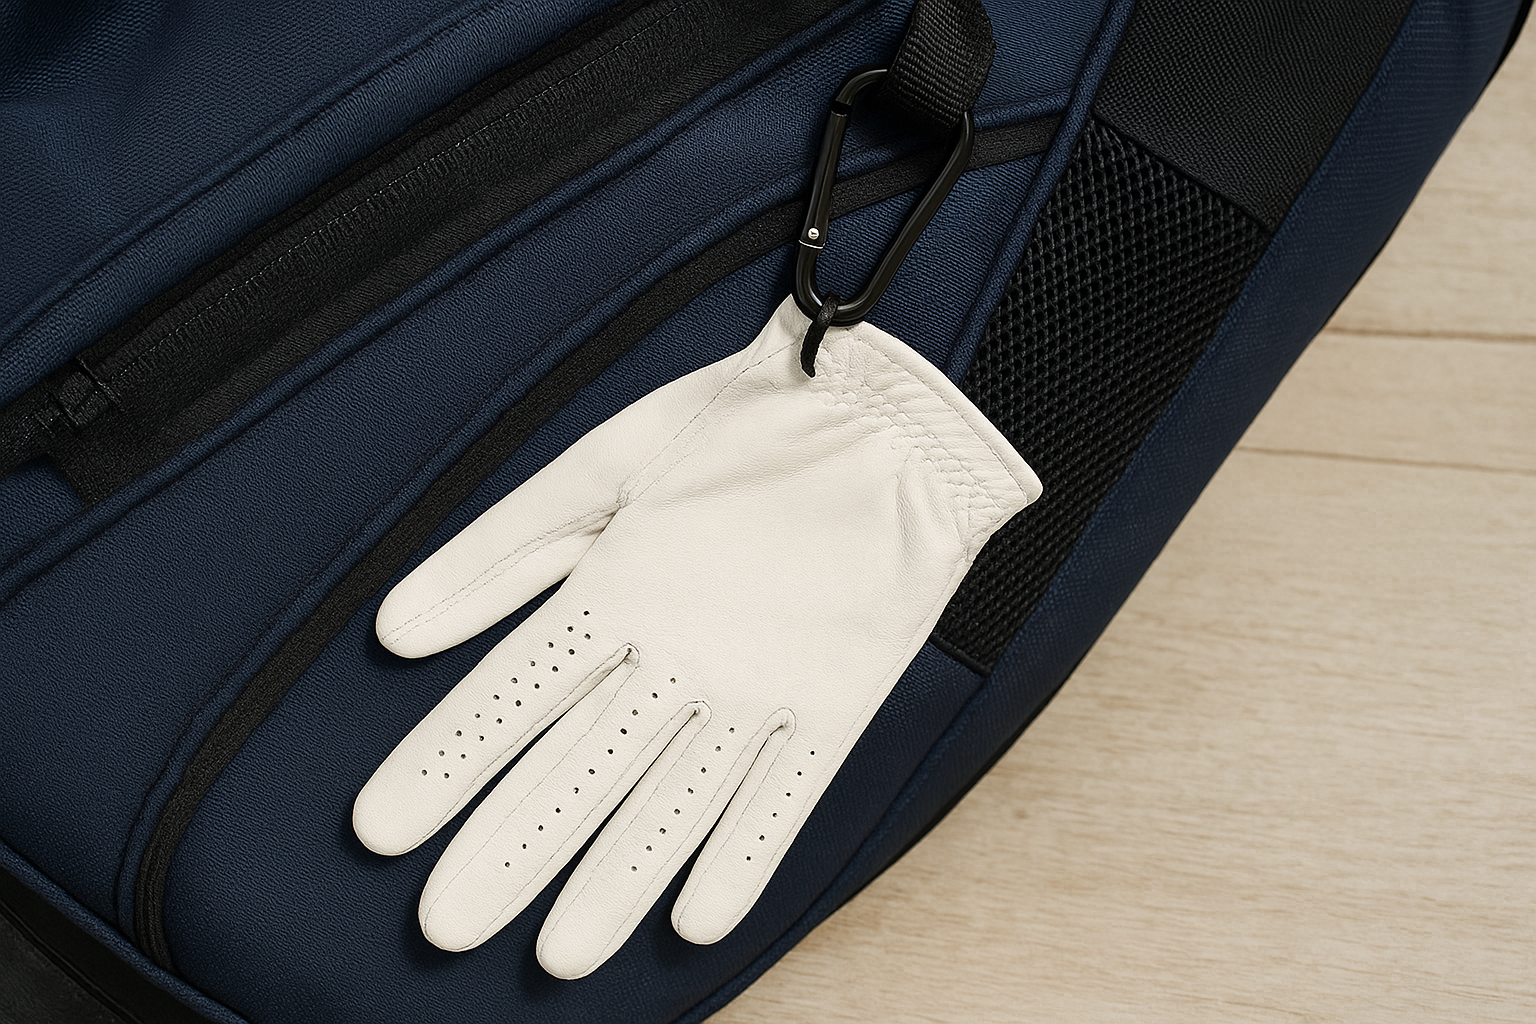
Never seal a golf glove inside a plastic bag or airtight container - trapped humidity is the main cause of mould on gloves that haven't been stored long enough to feel visibly wet.
If you carry more than one glove, keep them separated rather than stacked on top of each other. Stacking restricts airflow between gloves and causes both to retain moisture for longer than they would if stored individually.
Avoid the wrong environments
Where you store your gloves matters as much as how you store them. Car boots and dashboards rank among the worst environments for gloves, since temperatures in these spaces regularly exceed levels that damage both leather and synthetic materials, even on a moderately warm day. A cool, dry location at room temperature, such as a shelf in a cupboard or a well-ventilated section of your golf bag, is the right call.
Here is a quick reference to guide your storage decisions:
| Storage option | Safe? | Why |
|---|---|---|
| Flat in a breathable pouch | Yes | Maintains shape and allows airflow |
| Glove clip on outside of bag | Yes | Keeps glove flat and aired at all times |
| Sealed plastic bag | No | Traps moisture and promotes mould |
| Bottom of a closed bag pocket | No | Holds heat and blocks airflow |
| Car boot or dashboard | No | Temperature extremes damage the material |
Step 6. Restore grip and reduce odour
Even a well-maintained glove can gradually lose its tackiness and develop an unpleasant smell after repeated rounds. Understanding how to care for golf gloves includes knowing how to bring back grip and deal with odour before either problem gets bad enough to affect your game or force an early replacement. Both issues have straightforward fixes that work best when you address them early rather than waiting until the glove is borderline unusable.
Restore grip without buying a new glove
Grip loss on a golf glove usually comes from one of two sources: surface dirt and sweat residue building up on the palm, or the outer material simply wearing smooth from repeated friction. In many cases, what feels like a worn-out glove is actually just a dirty one, and a proper clean using the method in Step 3 will bring most of the tackiness back on its own. If cleaning alone isn't enough, a very light application of grip-enhancing glove conditioner designed specifically for sports gloves can restore surface tack without making the material slippery or greasy.
Avoid using regular hand lotions or skin creams on the palm area of your glove - most contain oils that actively reduce grip rather than restore it.
Work any conditioner in using the pads of your fingertips, spreading a thin, even layer across the palm and the gripping surface of each finger. Leave it for five minutes, then wipe off any excess with a clean dry cloth before the glove goes near a club. Apply too much and the surface becomes slick rather than tacky, so less is always better when using grip-restoring products.
Deal with odour properly
Glove odour comes from bacteria that builds up in sweat-soaked material, not just from the smell of perspiration alone. Masking it with sprays doesn't solve the underlying problem. The most effective approach is to combine a thorough hand wash with a short soak in a solution of cool water and white vinegar at roughly a 4:1 ratio for no longer than five minutes. White vinegar neutralises the bacteria causing the smell rather than covering it, and it won't damage either leather or synthetic fibres at this dilution.
After the vinegar soak, rinse the glove thoroughly in cool clean water and dry it using the flat air-drying method from Step 4. Repeating this process once a month during periods of regular play keeps odour from building up to a level that a standard wash alone can't handle.
Step 7. Fix common problems fast
Even with a solid routine in place, gloves sometimes develop specific problems that need a targeted fix rather than a standard clean. Knowing how to care for golf gloves when something goes wrong saves you from replacing a glove that can still be recovered. Most common issues have a straightforward solution if you catch them early and apply the right technique rather than a generic one.
When your glove shrinks or stiffens after washing
This is the most frequent complaint, and it almost always comes from exposure to excess heat or hot water during cleaning or drying. If your glove has already come out stiff, don't panic. Dampen it lightly with cool water, put it back on your hand, and flex your fingers repeatedly for two to three minutes while it's still wet. This works the fibres back into a more pliable state. Then apply a thin layer of leather conditioner to the palm side and lay the glove flat to dry naturally at room temperature.
This method works best within 24 hours of the problem occurring - the longer stiffened leather sits, the harder it becomes to reverse.
When seams start to split
Seam separation usually starts at the thumb or between the index and middle fingers, since these areas absorb the most rotational stress during your swing. If the split is small (less than 5mm), a tiny amount of fabric adhesive applied carefully with a toothpick can hold it in place temporarily. Press the seam together firmly and allow 30 minutes to set before touching it again. This won't restore full structural integrity, but it buys you several more rounds before replacement becomes unavoidable.
For anything larger than a small split, the seam has broken down past the point where adhesive alone holds reliably. At that stage, consider the glove a short-term option rather than a permanent fix.
When the glove loses its shape
A glove that has dried curled or misshapen can be gently reformed using a combination of light dampening and reshaping by hand. Lightly mist the inside of the glove with cool water, then slide it back on your hand and press it flat against a surface for two minutes to encourage the material to remember its correct form. Remove it carefully and stuff the glove loosely with a clean rolled cloth before leaving it to dry flat. This internal support stops the fingers from curling inward as the material dries and sets into shape.
Step 8. Know when to replace your glove
No matter how well you follow every step in this guide, every glove has a fixed lifespan, and recognising when yours has reached it is just as important as knowing how to care for golf gloves properly. Holding onto a glove that has deteriorated past the point of recovery doesn't just feel uncomfortable, it actively hurts your grip and club control during your swing. Replacing a glove at the right time is a practical decision, not a failure of your care routine.
Signs that go beyond repair
Some glove problems are fixable, but others signal that the material has broken down beyond what cleaning, conditioning, or reshaping can address. Use this checklist to assess whether your glove is recoverable or done. If you tick more than two of these boxes, replacement is the right call rather than another round of maintenance.
| Sign | What it tells you |
|---|---|
| Palm is slick even after a thorough clean | Surface material has worn through permanently |
| Leather is cracking across the full palm | Fibres have dried and split beyond conditioning |
| Seam splits longer than 10mm at thumb or fingers | Structural integrity is gone |
| Glove no longer fits snugly after reshaping | Material has stretched or warped permanently |
| Mould has penetrated the inner lining | Deep contamination that washing cannot fully remove |
| Grip feels inconsistent mid-round | The glove is affecting your game directly |
If your glove is causing you to adjust your grip mid-swing to compensate for a slippery or stiff palm, replace it immediately rather than finishing the round with it.
How long a glove typically lasts
Average glove lifespan depends heavily on how often you play and how consistently you maintain it. For a golfer playing two or three rounds per week with a solid care routine in place, a good quality leather glove should last between 10 and 20 rounds before grip and feel start to drop noticeably. Synthetic gloves tend to last slightly longer under the same conditions because the material handles moisture and friction more robustly than natural leather.
Casual golfers who play once a week and follow the routine steps in this guide can reasonably expect 15 to 25 rounds from a single glove before performance drops. If your glove is wearing out faster than this, revisit your post-round routine first, since improper drying and storage account for the majority of premature glove failure. Buying a better glove without fixing your habits will produce exactly the same result in a shorter timeframe.
Keep your glove in good shape
Knowing how to care for golf gloves comes down to a handful of consistent habits applied after every round rather than one intensive cleaning session every few weeks. A quick post-round routine, proper drying, and flat storage are the three actions that make the biggest difference to how long your gloves last and how well they perform when it matters.
Each step in this guide is something you can start today. Begin with the post-round airing routine and build from there. Once you treat your glove as a piece of equipment worth maintaining rather than a disposable accessory, the rest follows naturally, and you will notice your gloves holding their grip and softness for noticeably longer. When it is finally time for a fresh pair, browse our full range of golf gloves at MoreSports for options from FootJoy, TaylorMade, Under Armour, and more, all at competitive UK prices with free delivery on orders over £25.